The full guide to the Honda BeAT’s maintenance schedule. This article talks about the technical details, how to change or replace parts and components on a Honda BeAT Motorcycle, and when to do those things.
Fuel Line
The Fuel Line of Honda BeAt must Inspect (clean, adjust, lubricate, or replace if necessary) every 6,000km and yearly checkup is recommended.
Fuel Level
The Honda Beat uses unleaded gas and has a fuel capacity of 4 liters.
* Fuel level-Fill fuel tank when necessary.
* Fuel type: Unleaded petrol only
* Fuel octane number: Your scooter is designed to use Research Octane Number (RON) 88 or higher.
* Tank capacity: 4.0 litres (1.06 US gal, 0.88 lmp gal)
Refueling and Fuel Guidelines
Follow these guidelines to protect the engine and catalytic converter:
● Use only unleaded petrol.
● Use recommended octane number. Using lower octane petrol will result in decreased engine performance.
● Do not use fuels containing a high concentration of alcohol.
● Do not use stale or contaminated petrol or an oil/petrol mixture.
● Avoid getting dirt or water in the fuel tank.
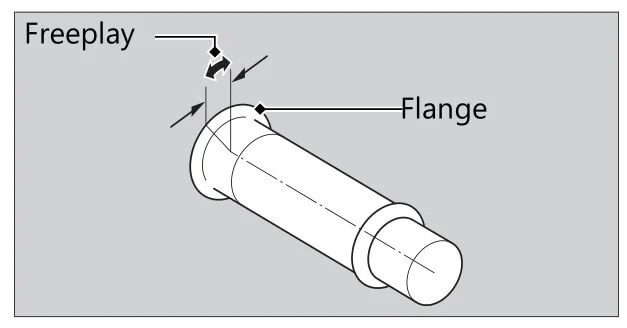
Throttle Operation
Honda BeAt the throttle must Inspect (clean, adjust, lubricate, or replace if necessary) every 6,000km and must check yearly.
Check for smooth opening and full closing in all steering positions.
Checking the Throttle With the engine off, check that the throttle rotates smoothly from fully closed to fully open in all steering positions and throttle free play is correct. If the throttle does not move smoothly, close automatically, or if the cable is damaged, have the scooter inspected by your dealer.
Free play at the throttle grip flange: 2 to 6 mm (0.1 to 0.2 in)
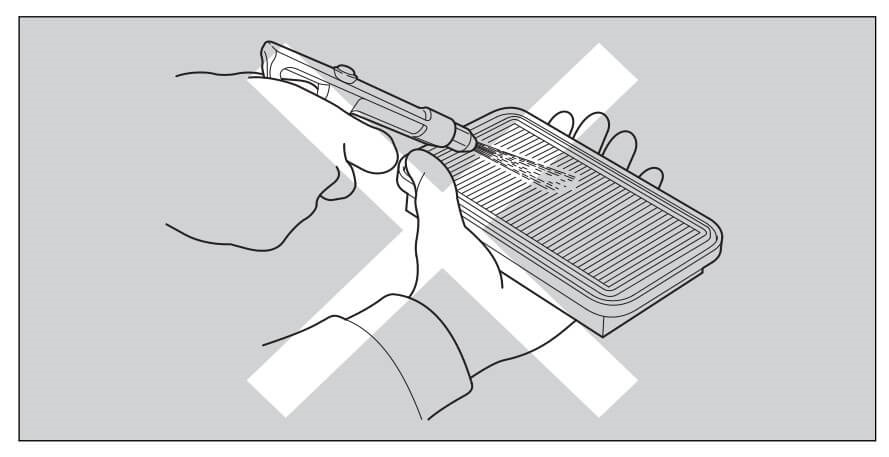
Air Cleaner
When to replace the Air Cleaner? The air cleaner of the Honda BeAT must be replace every 18,000km.
This scooter is equipped with a viscous type air cleaner element. Air blow cleaning or any other cleaning can degrade the viscous element performance and cause the intake of dust. Do not perform the maintenance. Should be serviced by your dealer.
NOTE: Service more frequently when riding in unusually wet or dusty areas.
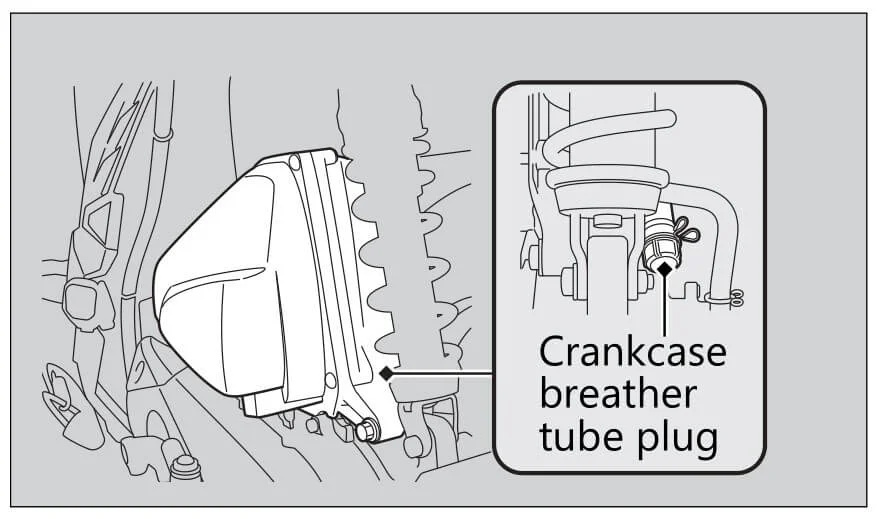
Crankcase Breather
When to clean the Crankcase breather? The Crankcase Breather of Honda BeAT must clean every 6,000km.
Service more frequently when riding in rain, at full throttle, or after the scooter is washed or overturned. Service if the deposit level can be seen in the transparent section of the drain tube. If the drain tube overflows, the air filter may become contaminated with engine oil causing poor engine performance.
Cleaning the Crankcase Breather
* Place a suitable container under the crankcase breather tube.
* Remove the crankcase breather tube plug from the tube.
* Drain deposits into a suitable container.
* Install the crankcase breather tube plug.
NOTE: Service more frequently when riding in rain or at full throttle.
Spark Plug
When to replace the Spark plug? The Spark Plug of Honda BeAT must Inspect clean every 6,000km, 18,000km and 30,000km and recommend be replace every 12,000km.
Recommended Spark plug for Honda BeAT: Spark plug (standard) MR9C-9N (NGK) or U27EPR-N9 (DENSO).
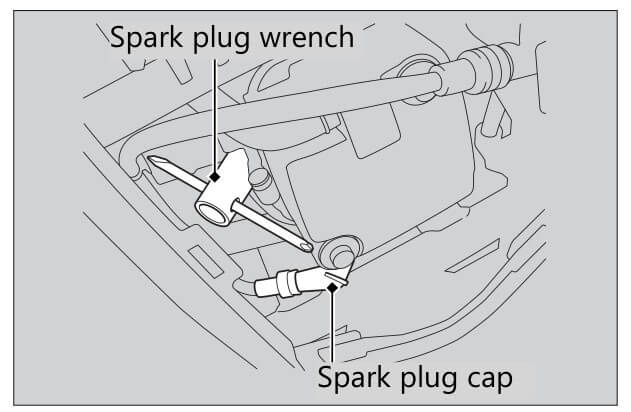
Checking Spark Plug
Below is the guide on how to check the spark plug on Honda BeAT.
1. Remove the center cover by removing the screws A and the screws B.
2. Disconnect the spark plug cap from the spark plug.
3. Clean any dirt from around the spark plug base.
4. Remove the spark plug using the spark plug wrench provided in the tools.
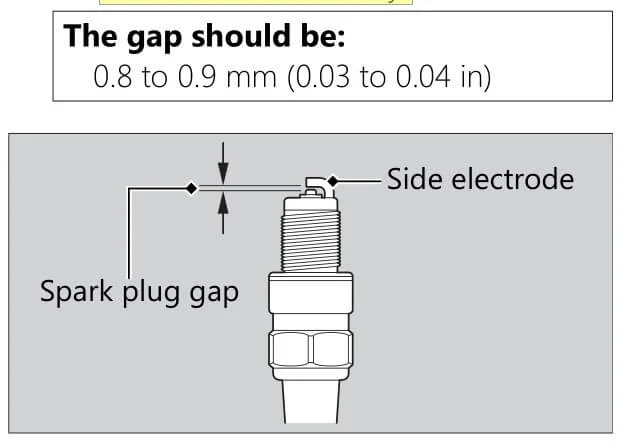
5. Inspect the electrodes and center porcelain for deposits, erosion or carbon fouling.
* If the erosion or deposit is heavy, replace the plug.
* Clean a carbon or wet-fouled plug with a plug cleaner, otherwise use a wire brush.spark plug
6. Check the spark plug gap using a wire- type feeler gauge.
* If adjustment is necessary, bend the side electrode carefully.spark plug gap
7. Make sure the plug washer is in good condition.
8. Install the spark plug. With the plug washer attached, thread the spark plug in by hand to prevent cross-threading.
9. Tighten the spark plug: NOTICE: An improperly tightened spark plug can damage the engine. If a plug is too loose, a piston may be damaged. If a plug is too tight, the threads may be damaged.
* * If the old plug is good: 1/8 turn after it seats.
* * If installing a new plug, tighten it twice to prevent loosening:
* * * a) First, tighten the plug: NGK: 1/2 turn after it seats. DENSO: 3/4 turn after it seats.
* * * b) Then loosen the plug.
* * * c) Next, tighten the plug again: 1/8 turn after it seats.
10. Reinstall the spark plug cap. Take care to avoid pinching any cables or wires.
ENGINE OIL
When to Change or Replace the Oil on Honda BeAT? The engine oil in the Honda BeAT must be change after the first 1,000 kilometers and then every 6,000 kilometers thereafter.
Checking the Engine Oil on Honda BeAT
What is the exact level of the oil in Honda BeAT? Check that the oil level is between the upper level and lower level marks in the oil fill cap/dipstick.
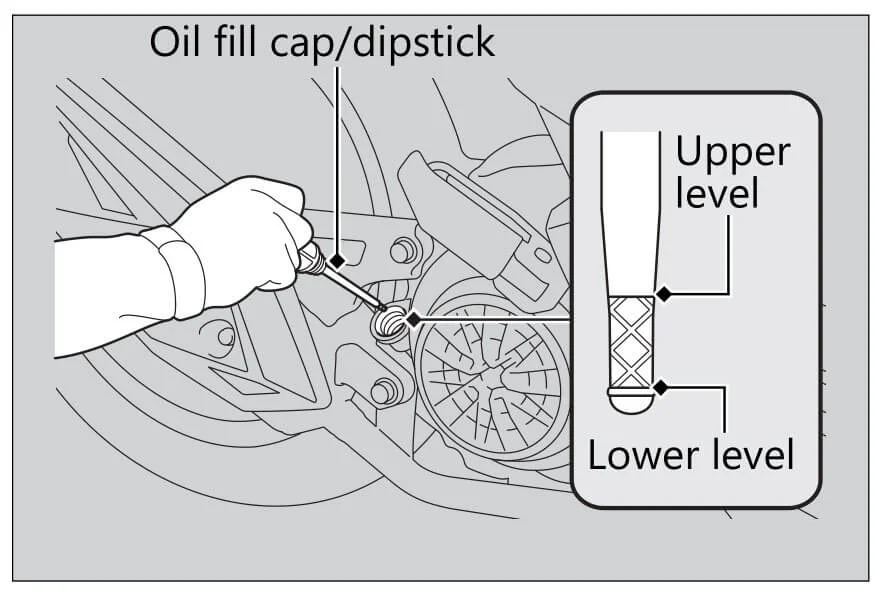
Check the engine oil with the Idling Stop switch at IDLING.
1. If the engine is cold, idle the engine for 3 to 5 minutes.
2. Turn the ignition switch to the OFF position and wait for 2 to 3 minutes.
3. Place your scooter on its center stand on a firm, level surface.
4. Remove the oil fill cap/dipstick and wipe it clean.
5. Insert the oil fill cap/dipstick until it seats, but don’t screw it in.
6. Check that the oil level is between the upper level and lower level marks in the oil fill cap/dipstick.
7. Securely install the oil fill cap/dipstick.
Changing the Oil Quantity
How much oil do I need for an oil change on my Honda BeAT? Required oil When changing oil & cleaning the strainer screen: 0.8 litres (0.8 US qt, 0.7 Imp qt) When changing oil only: 0.7 litres (0.7 US qt, 0.6 Imp qt).
Engine Oil Strainer Screen
When to clean the Engine Oil Strainer Screen on Honda BeAT? The Engine Oil Strainer Screen must be clean every 12,000km.
Oil Change Procedure
Please follow the instructions below to guide you on how to perform the oil change on your Honda BeAT Motorcycle.
1. If the engine is cold, idle the engine for 3 to 5 minutes.
2. Turn the ignition switch to the OFF position and wait for 2 to 3 minutes.
3. Place your scooter on its center stand on a firm, level surface.
4. Place a drain pan under the drain bolt and oil plug.
5. Remove the oil fill cap/dipstick, drain bolt and sealing washer to drain the oil.
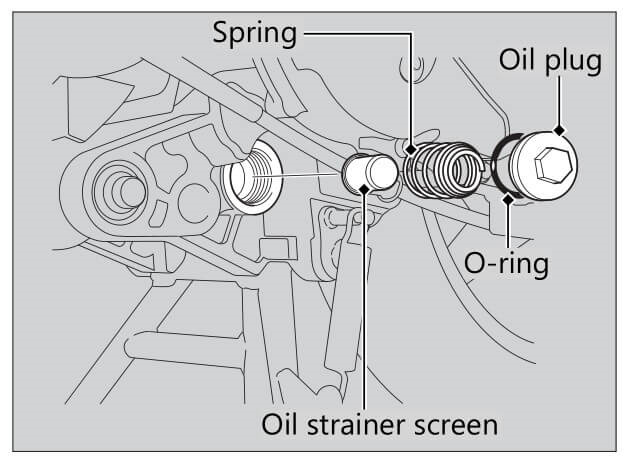
6. Remove the oil plug, O-ring, spring and oil strainer screen and let the remaining oil drain out.
* Discard the oil at an approved recycling center.
7. Clean the oil strainer screen.
8. Check that the oil strainer screen and sealing rubber are in good condition.
9. Replace the O-ring and apply a thin coat of engine oil to the new O-ring before installing it.
10. Install the oil strainer screen, spring and oil plug and tighten.
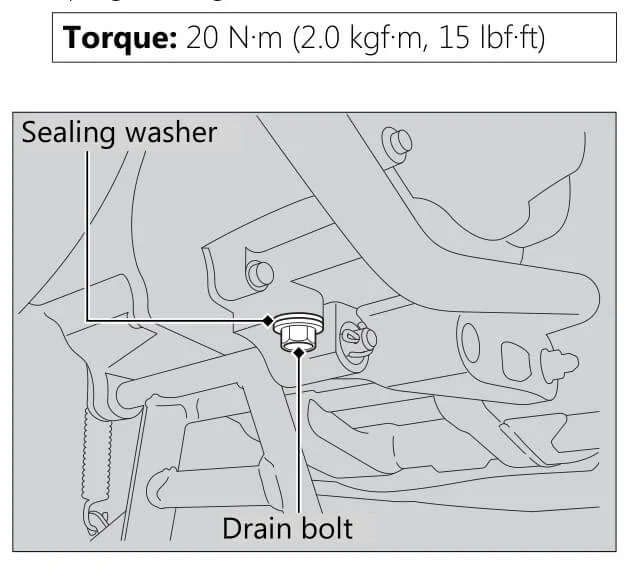
11. Install a new sealing washer onto the drain bolt. Tighten the drain bolt. (Torque: 24 N·m (2.4 kgf·m, 18 lbf·ft)
12. Fill the crankcase with the recommended oil and install the oil fill cap/ dipstick.
Required oil
When changing oil & cleaning the strainer screen:
0.8 litres (0.8 US qt, 0.7 Imp qt)
When changing oil only:
0.7 litres (0.7 US qt, 0.6 Imp qt)
13. Check the oil level.
14. Check that there are no oil leaks.
Engine Idle Speed
The engine idle speed of the Honda BeAT must be clean for the first 1,000 km and followed every 6,000 km.
Drive Belt
When to replace the drive belt on the Honda BeAT? The drive belt of the Honda BeAT must be inspected, cleaned, and adjusted every 12,000 km and replaced every 24,000 km.
Gear Oil
When to replace the gear oil on a Honda BeAT? The gear oil on the Honda BeAT must be replaced every 2 years. NOTE: Replacement requires mechanical skill.
Battery
The battery of the Honda BeAT must be inspected (clean, adjusted, or replaced if necessary) every 6,000 km and a yearly checkup is recommended.
Your scooter has a maintenance-free type battery. You do not have to check the battery electrolyte level or add distilled water. Clean the battery terminals if they become dirty or corroded. Do not remove the battery cap seals. There is no need to remove the cap when charging
Brake Fluid
How often should I replace the brake fluid on my Honda BeAT? The Honda BeAT brake fluid must be inspected (clean, adjusted, lubricated, or replaced if necessary) every 6,000 km. A yearly checkup is necessary, and you should replace the brake fluid every 2 years.
Do not add or replace brake fluid, except in an emergency. Use only fresh brake fluid from a sealed container. If you do add fluid, have the brake system serviced by your dealer as soon as possible.
NOTE: Replacement requires mechanical skill.
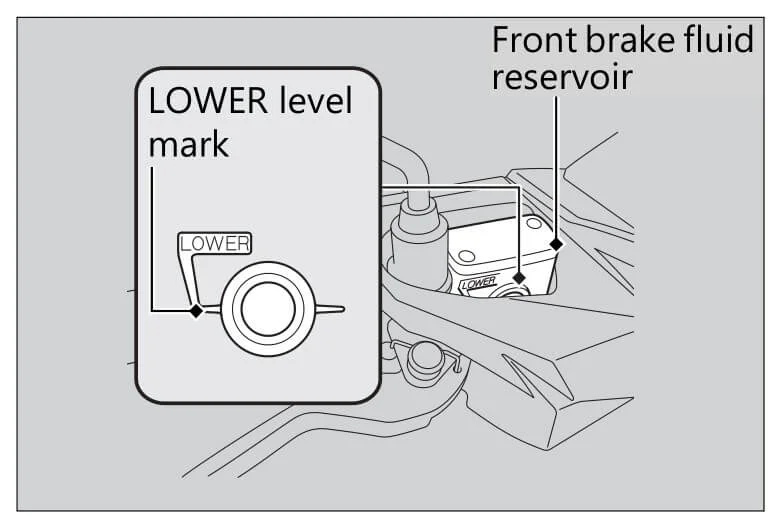
Checking the Front Brake Fluid
Place your scooter in an upright position on a firm, level surface.
Check that the brake fluid reservoir is horizontal and that the fluid level is above the lower level mark. If the brake fluid level in the reservoir is below the lower level mark or the brake lever free play becomes excessive, inspect the brake pads for wear. If the brake pads are not worn, you most likely have a leak. Have your scooter inspected by your dealer.
Brake Shoes/Pads Wear
The Honda BeAT’s brake shoes/pads must be inspected (clean, adjusted, lubricated, or replaced if necessary) every 6,000 km, and a yearly checkup is recommended.
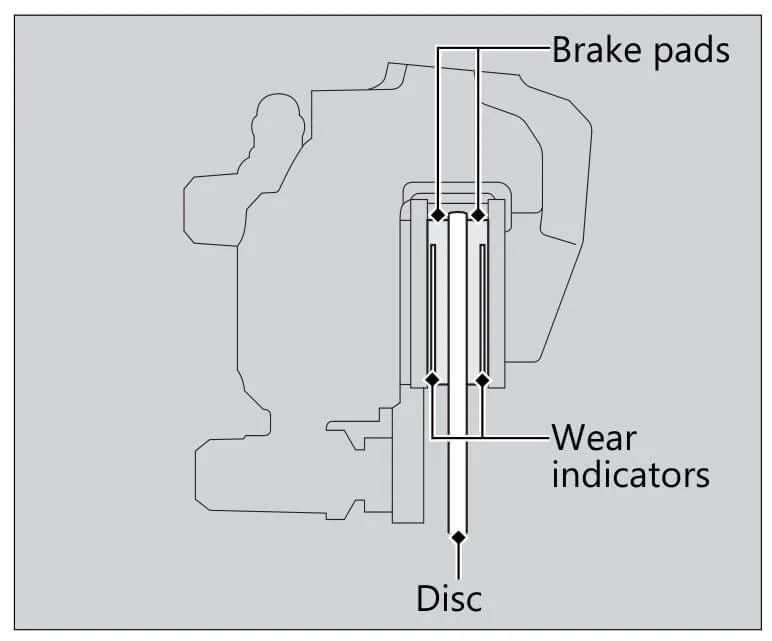
Inspecting the Front Brake Pads
Check the condition of the brake pad wear indicators. The pads need to be replaced if a brake pad is worn to the indicator. Inspect the brake pads from below the brake caliper. If necessary, have the pads replaced by your dealer. Always replace both the left and right brake pads at the same time.
Brake System
The brake system of the Honda BeAT must be inspected (clean, adjusted, lubricated, or replaced if necessary) for the first 1,000 km and every 6,000 km, and a yearly checkup is recommended.
Inspecting the Rear Brake Lever Free play
1.) Place the scooter on its center stand.
2.) Determine the length of the rear brake lever before it begins to engage. Check the brake cable for kinks or signs of wear. If necessary, have it replaced by your dealer. Lubricate the brake cable with a commercially available cable lubricant to prevent premature wear and corrosion. Make sure the brake arm, spring, and fastener are in good condition.
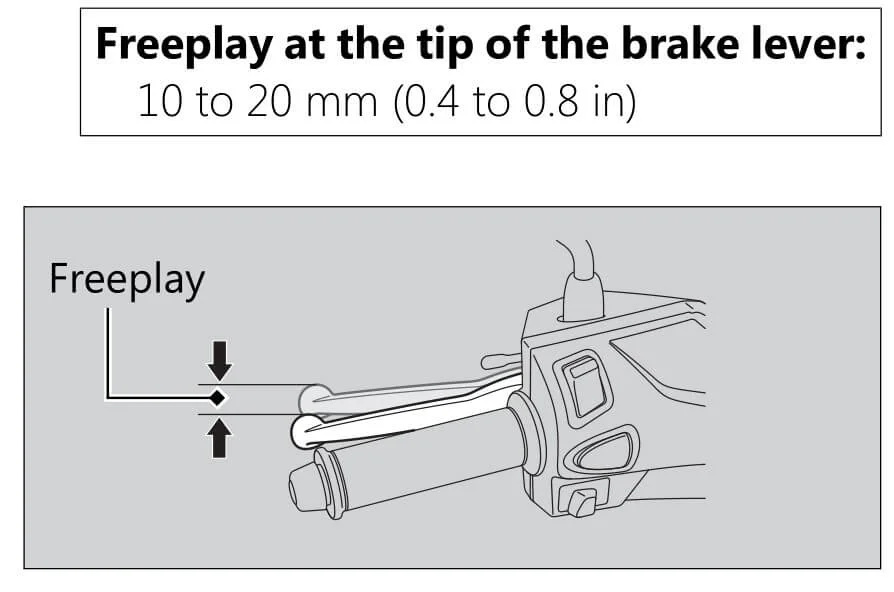
Adjusting the Rear Brake Lever Free play
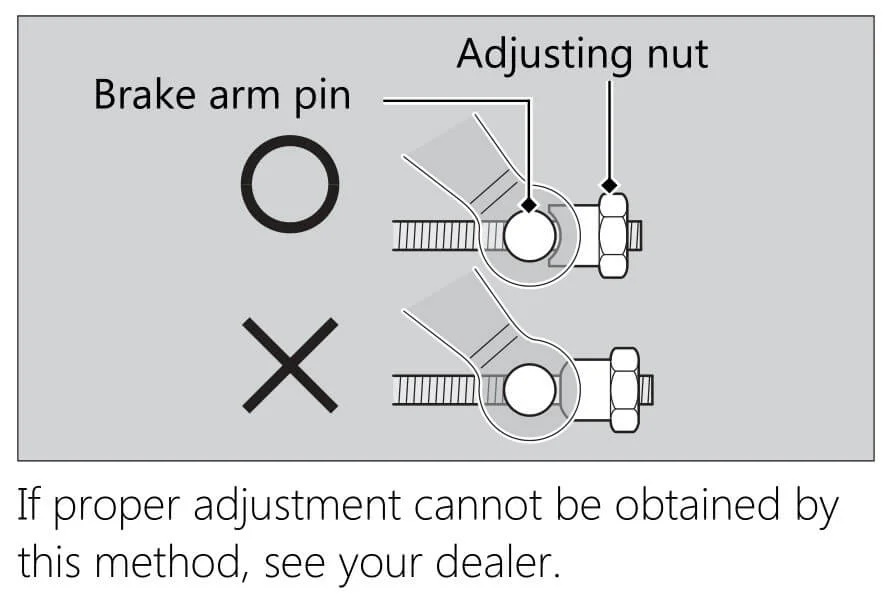
Adjust the free play of the brake lever with the front wheel pointed straight ahead. Make sure the cut-out on the adjusting nut is seated on the brake arm pin when adjusting the free play.
1. Adjust by turning the rear brake adjusting nut a half-turn at a time.
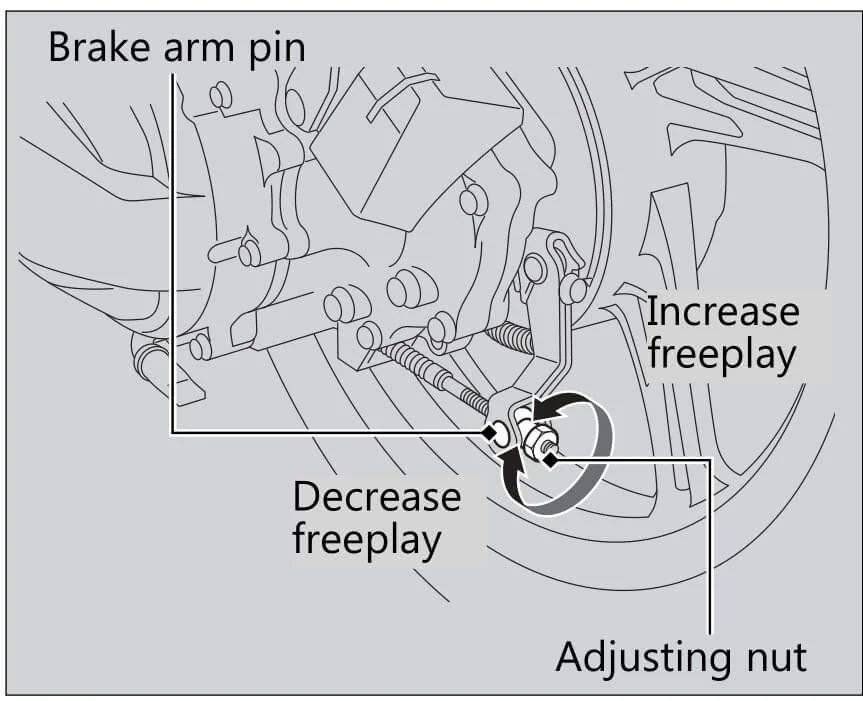
2. Apply the brake several times and check for free wheel rotation after the brake lever is released.
3. Push the brake arm to confirm that there is a gap between the rear brake adjusting nut and brake arm pin.
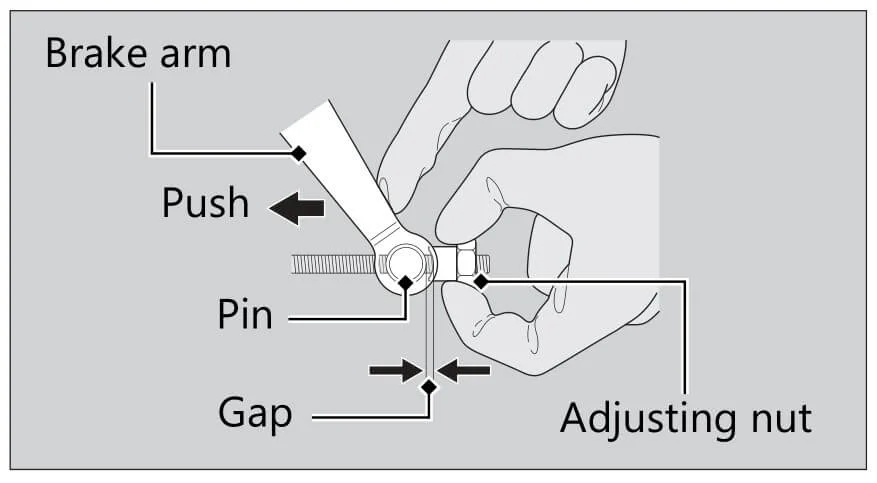
After adjustment, confirm the free play of the brake lever. Make sure the brake rod, brake arm, spring and fastener are in good condition.
NOTE: Do not turn the adjuster beyond its natural limits.
Inspecting the Rear Brake Shoe Wear
The rear brake is equipped with a brake wear indicator.
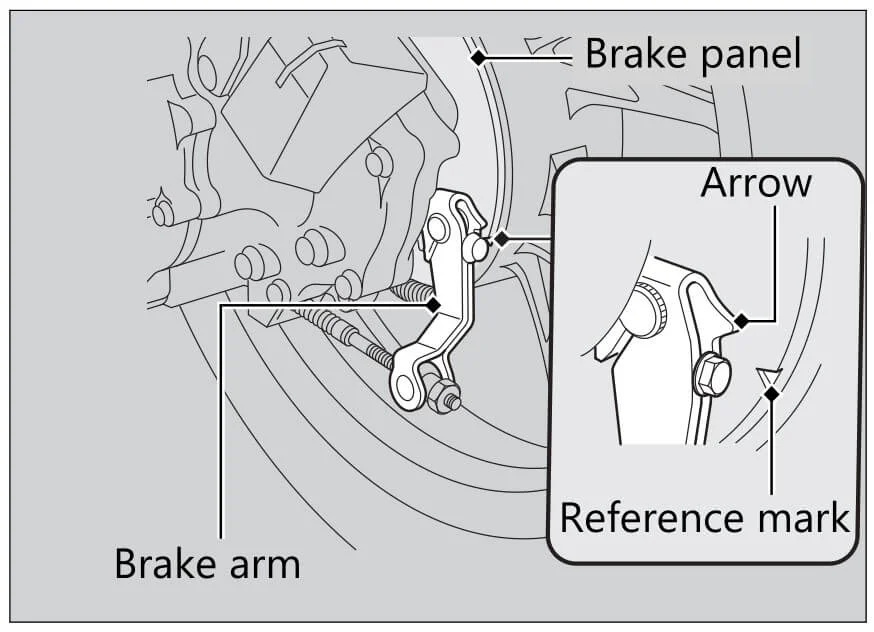
When the brake is applied, an arrow attached to the brake arm moves toward a reference mark on the brake panel. If the arrow aligns with the reference mark on full application of the brake, the brake shoes must be replaced. See your dealer for this service.
When the brake service is necessary, see your dealer. Use only Honda Genuine Parts or its equivalent.
Brake Lock Operation
The Brake Lock Operation of Honda BeAT must Inspect (clean, adjust, lubricate, or replace if necessary) every 6 months.
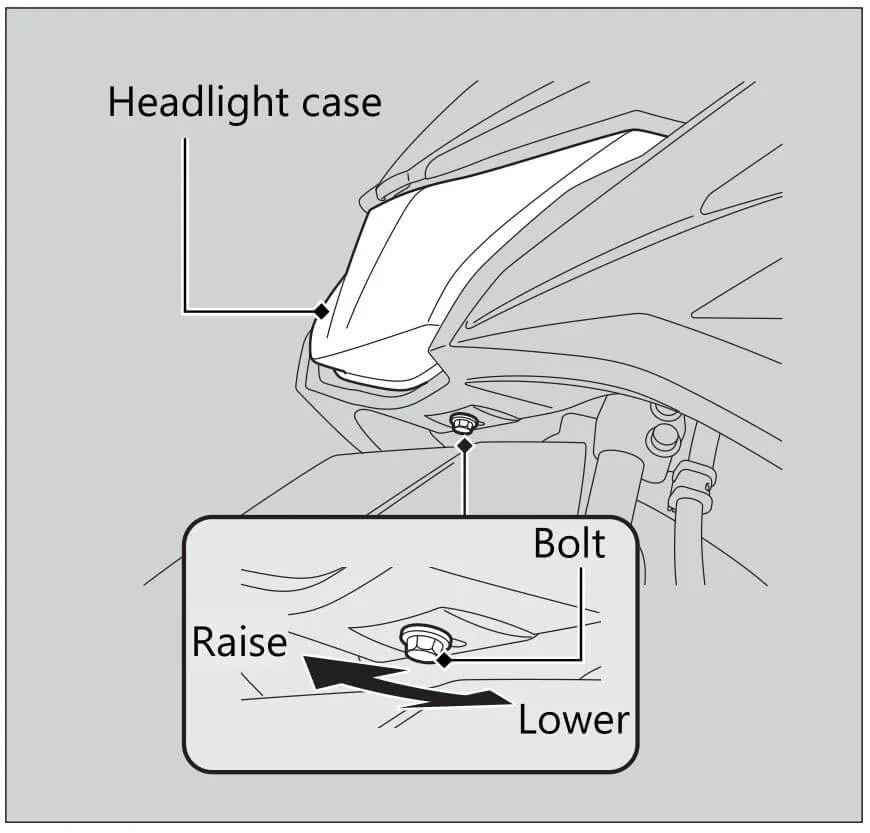
Headlight Aim
The headlight aim of the Honda BeAT must be inspected (clean, adjusted, replaced if necessary) every 6,000 km, and a yearly checkup is recommended.
Adjusting the Headlight Aim
You can adjust vertical aim of the headlight for proper alignment. To move the headlight case, loosen the bolt. Tighten the bolt after adjustment. Obey local laws and regulations.
Clutch Shoes Wear
Honda BeAT clutch shoes must be inspected (clean, adjusted, or replaced if necessary) every 12,000 km.
Side Stand
The side stand of the Honda BeAT must be inspected (clean, adjusted, lubricated, or replaced if necessary) every 6,000 km and a yearly checkup is recommended.
Checking the Side Stand
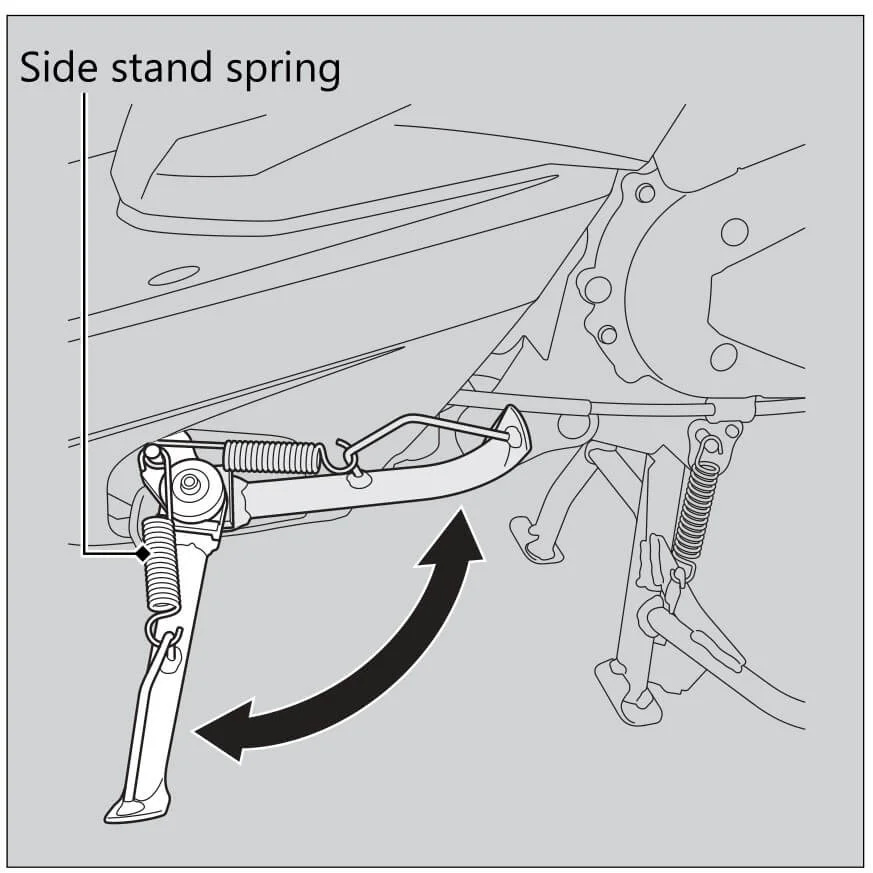
1. Place your scooter on its center stand on a firm, level surface.
2. Check that the side stand operates smoothly. If the side stand is stiff or squeaky, clean the pivot area and lubricate the pivot bolt with clean grease.
3. Check the spring for damage or loss of tension.
4. Sit on the scooter and raise the side stand.
5. Start the engine.
6. Lower the side stand all the way. The engine should stop as you lower the side stand. If the engine doesn’t stop, have your scooter inspected by your dealer.
Suspension
The suspension of the Honda BeAT must be inspected (clean, adjusted, lubricated, or replaced if necessary) every 6,000 km and a yearly checkup is recommended.
Nuts, Bolts, Fasteners
The Nuts, Bolts, and Fasteners of Honda BeAT must be inspected (clean, adjust, lubricate, or replace if necessary) for the first 1,000 km, followed by every 6,000 km, and a yearly checkup is recommended.
Wheels/Tyres
The wheels and tires of the Honda BeAT must be inspected (clean, adjusted, lubricated, or replaced if necessary) every 6,000km.
Steering Head Bearings
The Steering Head Bearings must Inspect (clean, adjust, lubricate, or replace if necessary) every 12,000km.
More information about honda, please click Honda Trouble Repair.