 [Login],New User?
 [Join Free]
Hot search :
ICARSCAN |
KTAG |
KESSV2 |
IM608 |
ELITE |
ICOM |
C4 |
C5 |
C6 |
GDSVCI |
TECH2 |
Nexiq |
Consult-3 |
Digimaster3 |
MDI2 |
JPRO |
VCM2 |

 |  |  |  |
How to Register and Update AUTEL MaxiSys Elite
In order to get access to the Support platform and obtain update and otherservices from Autel, you are required to register the MaxiSys Elite Diagnostic Device the first time you use it.
1.Visit the website: //pro.autel.com
2.On the Sign In page, input your account ID and other information to log in, if you already have an account.
3.If you are a new member to Autel and do not have an account yet, click the Create Autel ID buttonon the left side.
4.Enter the required information in the input fields, read through Autel’s Terms and Conditions and tick on Agree, and then click Create Autel ID at the bottom to continue.
5.The online system will automatically send a confirmationemail to the registered email address. Validate your account by clicking the link provided through the mail. A product registration screen opens.
6.Find out the device’s serial number and password from the About section of the Settings application on the MaxiSys Display Tablet.
7.Select the product model of your device, enter the product serial number and password on the Product Registration screen, and click Submit to complete the registration procedure.
How to update maxisys elite software:
1.Power on the MaxiSys display tablet.
2.Connect the VCI device to MaxiSys tablet via USB.
3.Tap the VCI Manager application on the MaxiSys Job Menu of the display tablet
4.Select Update from the connection mode list.
5.The current version number and the latest version number of the VCI software will be displayed after a few seconds, click Update Now to update the VCI software if available
How To update the firmware of autel maxisys elite:
1.Power up the MaxiSys Display Tablet, and ensure that it is connected to a power source and with steady internet connection.
2.Tap the Update application button from the MaxiSys Job Menu; or tap theupdate notification message when received one. The Update application screen displays.
3.Check all available updates:
If you decide to update all the items, tap the Update All button.
If you only want to update some individual items, tap the Update button on the right column of the specific item.
4.Tap the Pause button to suspend the updating process. When you tap Continue to renew the update, the updating process will resume from the break point.
5.When the updating process is completed, the firmware will be installed automatically. The new version will replace the original version if there is one.
How to do BT Pairing
The VCI device needs to be either connected to a vehicle or to an available power source, so that it is powered up during the synchronization procedure.
Make sure the MaxiSys Display Tablet has a charged battery or is connected to an AC/DC power supply.
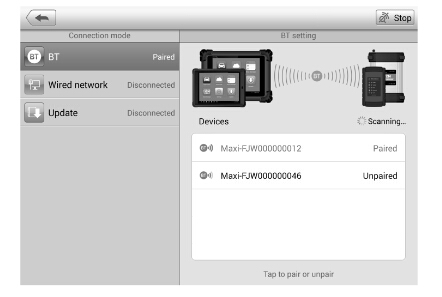
To pair the VCI device with the Display Tablet
1.Power on the MaxiSys Display Tablet.
2.Connect the 26-pin end of the data cable to the J2534 ECU Programming Device’s vehicle data connector.
3.Connect the 16-pin end of the data cable to the vehicle data link connector (DLC).
4.Tap the VCI Manager application on the MaxiSys Job Menu of the display tablet.
5.Select BT from the connection mode list.
6.Tap the Scan button at the top right corner. Now the device starts searching for available pairing units.
7.Depending on the VCI type you use, the device name may display as Maxi suffixed with a serial number. Select the required device for pairing.
8.When paring is successfully done, the connection status displayed to the right of the device name is shown as Paired.
9.Wait a few seconds, and t he VCI button on the system Navigation bar at the bottom of the screen shall display a green tick icon,indicating the display tablet is connected to the VCI device.
10.Tap the paired device again to unpair it.
11.Tap the Back button on the top left to return to the MaxiSys JobMenu.
NOTE:A VCI device can be paired to only one Display Tablet each time,and once it’s been paired, the device will not be discoverable for any other unit.
Wired Network Connection
The Wired Network is applied for connecting the MaxiSys Display Tablet with J2534 ECU Programming Device or to an existing LAN. This section describes connecting the display tablet with the J2534 ECU Programming Device through the Ethernet cable.
The J2534 ECU Programming Device needs to be either connected to a vehicle or to an AC/DC power source, so that it is powered up when communicating with the display tablet. Make sure the MaxiSys Display Tablet has a charged battery or is connected to an AC/DC power supply.
To connect the display tablet with the J2534 ECU Programming Device through wired network
1.Power on the MaxiSys Display Tablet.
2.Connect the 26 -pin end of the data cable to the J2534 ECU Programming Device’s vehicle data connector.
3.Connect the 16-pin end of the data cable to the vehicle data link connector (DLC).
4.Connect the MaxiSys Display Tablet to the programming device with the accompanied Ethernet serial cable.
5.Tap the VCI Manager application on the MaxiSys Job Menu of the display tablet.
6.Select Wired Network from the connection mode list. Now the Ethernet Setting interface displays.
7.Select a connection type:
DHCP–obtains the LAN IPaddressautomatically
Manual–allows you to enter IP address manually
8.IfManual is selected, you need to set the IP address on your own.
NOTE:If you are not sure about the specific IP address values, please contact your network administrator.
9.Tap Apply to set up the wired network connection.
10.Tap the Back button on the top left to return to the MaxiSys Job Menu
When the wired network is successfully connected, the connection status is displayed as Connected,and the two status lights at the corners alongside the Ethernet Ports on the display tablet illuminate. The solid amber light indicates steady connection, and the flashing green light indicates active co mmunication, between the units.The VCI navigation button at the bottom bar shall display a green tick icon after a few seconds ,indicating the MaxiSys Elite diagnostic platform is ready to perform vehicle diagnosis.
Troubleshooting Checklist
A.When the display tablet does not work properly:
Make sure the tablet has been registered online.
Make sure the system software and diagnostic application software are properly updated.
Make sure the tablet is connected to the Internet.
Check all cables,connections, and indicators to see if the signal isbeing received.
B.When battery life is shorter than usual:
This may happen when you are in an area with low signal strength.Turn off your device ifit’s not in use.
C.When you cannot turn on the tablet:
Make sure the tablet is connected to a power source or the battery ischarged.
D.When you are unable to charge the tablet:
Your charger may be out of order. Contact your nearest dealer.
You may be attempting to use the device in an overly hot/cold temperature.Try changing the charging environment
Your device may have not been connected to the charger properly.
Check the connector.
NOTE:If your problems persist, please contact Autel’s technical support personnel or your local selling agent.
- Company Info
- About OBD2TOOL
- Company News
- Payment & Shipping
- Payment Methods
- Shopping Guide
- Shipping Policy
- Company Policies
- Terms and Conditions
- Return Policy
- Privacy Policy
- Customer Service
- Contact us
- Check Your Order Information
- Products Warranty
- Forget your account password
- Track Your Package
- Other Business
- Dropship


