Removal Procedure
Preparation:
Before beginning, remove the flywheel. Refer to the Disassembly and Assembly manual section titled “Flywheel – Remove.”
Related Contents:
Perkins EST 2025A & 2023A & 2019A Software Free Download
Perkins SPI2 2018A EPC+Service Manual Free Download
Perkins adapter 3
NOTICE:
Always keep all components clean. Contaminants can cause rapid wear and shorten component life.
NOTICE:
Take necessary precautions to contain fluids during maintenance or disassembly. Use suitable containers to collect any fluid and dispose of it according to local regulations.
Note: The 2-cylinder, 3-cylinder, and 4-cylinder Perkins 400 series engines have different flywheel housing and back plate configurations, but the removal process is similar for all models.
Steps:
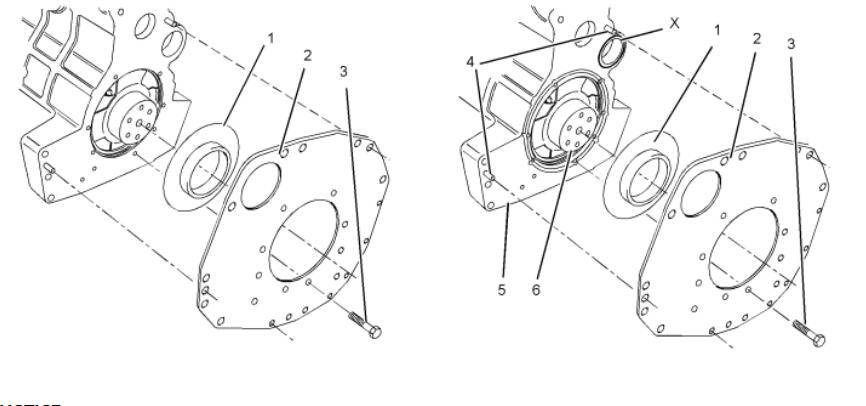
- Remove bolts (3) and detach the flywheel housing or back plate (2) from the cylinder block.
- Remove crankshaft rear seal (1) from the cylinder block and discard it.
Installation Procedure
- Ensure the mating surfaces of the cylinder block (5) and flywheel housing or back plate (2) are clean and undamaged. Inspect dowels (4) and replace them if damaged.
- Check that the crankshaft flange (6) is clean and free of damage. If the seal surface is worn or damaged, it can be repaired using a wear sleeve. Refer to “Sleeve (Rear) – Remove and Install” for details.
- Apply clean engine oil to the running surface of the crankshaft flange (6) where the rear seal contacts.
- Align a new crankshaft rear seal (1) with the crankshaft flange (6) and carefully install it onto the flange.
- Apply a continuous bead of Tooling (A) sealant to the rear face of the cylinder block around the edge of the crankshaft rear seal (1). Also, apply a bead around plug (X).
- Align the flywheel housing or back plate (2) with dowels (4). Install the housing or back plate and secure it to the cylinder block (5) with bolts (3). Refer to “Housing – Remove and Install” for more information.
- Tighten bolts (3) to the specified torque.
More trouble repair case for Perkins,pls refer to:Perkins Trouble Repair