The JPRO self-test utility helps verify that the JPRO software, Noregon DLA+ adapter, USB connection, and vehicle communication cables are working correctly.
Before Starting the Test
Connect the diagnostic equipment to a compatible vehicle:
- Connect the Noregon DLA+ adapter to the laptop using the USB cable.
- Connect the appropriate diagnostic cable between the adapter and the vehicle:
-
- 6-pin connector
- 9-pin connector
- OBD-II connector
- Turn the vehicle ignition to the ON position.
- Keep the engine off unless the self-test program specifically instructs you to start it.
- Confirm that the adapter’s power and communication indicators are illuminated.
Step 1: Open the JPRO Self-Test Utility
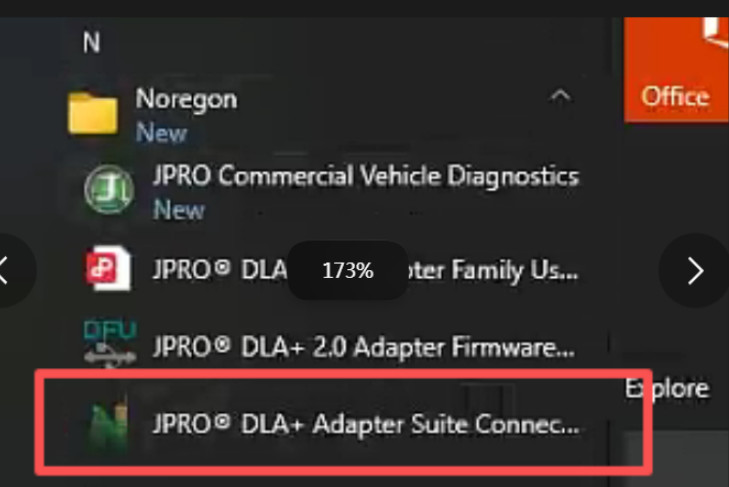
Click the Windows Start button in the lower-left corner of the computer screen.
Locate and select the JPRO/Noregon Self-Test program shown in the circled area of the image.
Step 2: Confirm the Connections
Before running the test, verify that:
- The Noregon adapter is connected to the laptop.
- The diagnostic cable is securely connected.
- The vehicle ignition is switched on.
- The correct adapter driver is installed.
- The adapter is receiving vehicle power.
A loose USB cable or incorrect vehicle connector may cause the self-test to fail.
Step 3: Start the Self-Test
Open the self-test program and click Start Test.
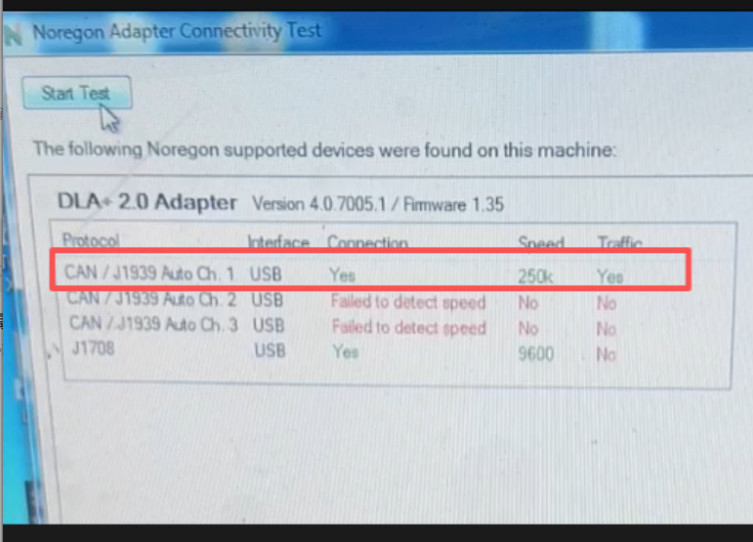
The utility will check the connected hardware, driver status, and vehicle communication channels.
Step 4: Review the Test Results
Wait for the self-test to finish. The results screen should show whether the following items passed or failed:
- USB connection
- Noregon adapter detection
- Device driver
- Vehicle power
- J1939 communication
- J1708 communication, where supported
- CAN communication
- Diagnostic cable connection
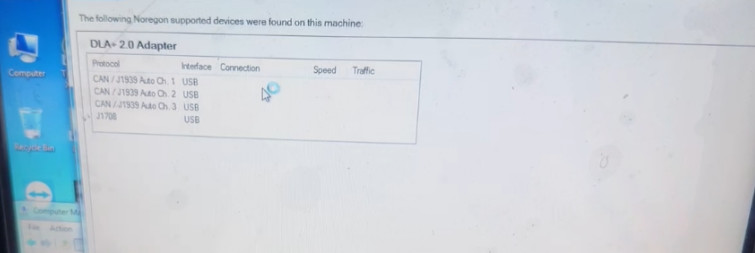
If all required checks pass, close the self-test utility and open JPRO Professional Diagnostics.
What to Do If the JPRO Self-Test Fails
Check the following items:
- Disconnect and reconnect the USB cable.
- Use a direct laptop USB port instead of a USB hub.
- Confirm that the correct Noregon driver is installed.
- Check the vehicle diagnostic-port fuse.
- Verify that the ignition is switched on.
- Inspect the diagnostic cable for bent or damaged pins.
- Try another compatible vehicle if available.
- Restart the laptop and run the test again.
If the adapter is detected but vehicle communication fails, the problem may be related to the vehicle connector, diagnostic cable, power supply, or communication network rather than the JPRO software.
Important: Do not disconnect the adapter or switch off the ignition while the self-test is running.
Need a Complete JPRO Diagnostic Kit?
For technicians who need a complete heavy- and medium-duty diagnostic setup, the JPRO Professional Truck Diagnostic Scanner Kit includes a Noregon DLA+ 2.0 USB adapter, 6-pin and 9-pin heavy-duty cables, medium-duty OBD-II cables, a USB cable, and a carrying case.
The kit is available with different JPRO software options. Before ordering, confirm the required software version, Windows compatibility, vehicle coverage, and activation terms. NextStep Service and Repair Information is not included and must be purchased separately.