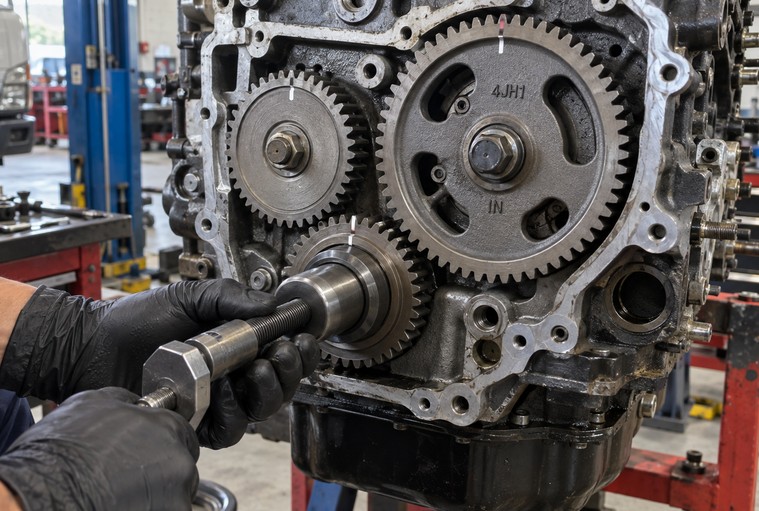
Installing the crankshaft timing gear on an Isuzu 4JH1 requires correct gear orientation and precise alignment with the idler, camshaft, and injection-pump gears. A one-tooth timing error can cause hard starting, poor power, smoke, abnormal combustion, or timing-gear noise.
This guide focuses on the practical checks that matter before, during, and after installation.
Before Installing the Crankshaft Gear
Before fitting the gear:
- Clean the crankshaft gear seat.
- Inspect the crankshaft gear for chipped or damaged teeth.
- Check the gear bore and crankshaft nose for burrs or wear.
- Identify the factory timing mark.
- Confirm the correct service procedure for the exact 4JH1 application.
Install the crankshaft timing gear with its timing mark facing outward.
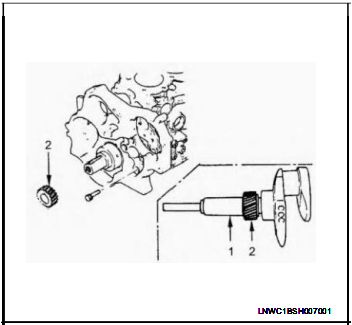
Install the 4JH1 Crankshaft Timing Gear.
Use the appropriate crankshaft timing gear installer rather than hammering the gear into position.
The referenced procedure specifies the installer:
9-8522-0020-0
Press the gear squarely onto the crankshaft until fully seated.
After installation, verify:
- Timing mark faces outward.
- Gear is fully seated.
- Gear runs square
- No teeth were damaged.
- Crankshaft seating surface remains undamaged.
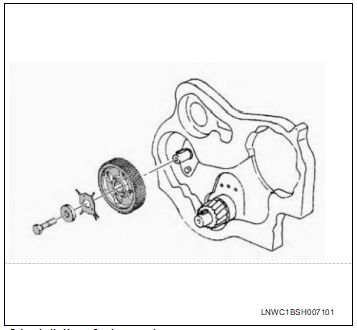
Align the Timing Gear Train
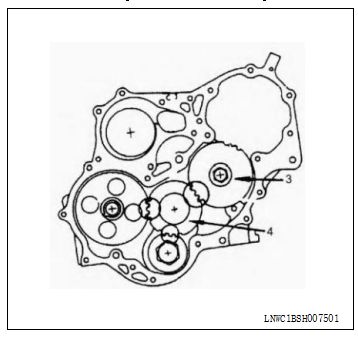
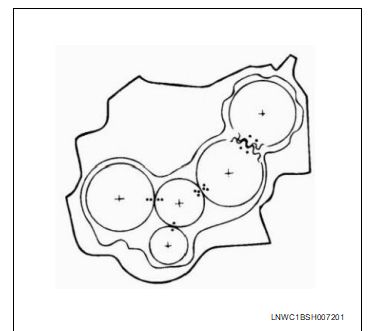
The crankshaft gear establishes the timing reference for the rest of the gear train.
The main relationships are:
Crankshaft Gear → Idler Gear A → Camshaft Gear
and, where applicable:
Idler Gear A → Idler Gear B → Injection Pump Gear
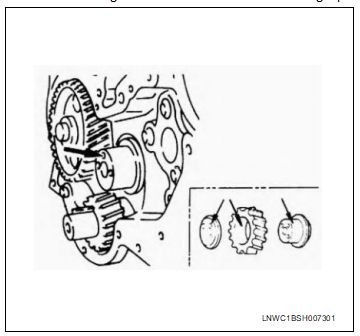
Match the factory timing marks exactly. Do not estimate alignment by counting gear teeth unless the correct workshop procedure specifically requires it.
Install the Idler Gear Correctly
Before installing the idler gear:
- Lubricate the gear and shaft with clean engine oil.
- Install the shaft in the specified orientation.
- Position the thrust collar correctly.
- Align all timing marks before tightening.
For the referenced procedure, the idler gear shaft oil hole should face upward.
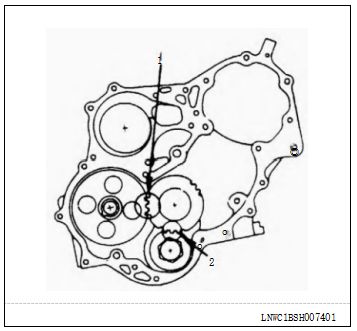
Scissor Gear Warning
Some 4JH1 gear trains use a scissor-type idler gear to control backlash and gear noise.
If a temporary locking bolt is used to retain scissor-gear preload:
Remove the locking bolt before rotating or starting the engine.
Leaving it installed can prevent normal engine rotation and may cause mechanical damage.
Check Timing Gear Backlash
Correct timing marks do not guarantee that the timing gears are mechanically serviceable.
The referenced 4J-series workshop information gives:
| Check | Specification |
| Timing gear backlash | 0.10–0.17 mm |
| Service limit | 0.30 mm |
| Idler gear A end play | 0.07 mm standard |
| Idler gear A service limit | 0.20 mm |
Excessive backlash can cause:
- Gear rattle
- Impact loading
- Accelerated wear
- Timing instability
If backlash exceeds the service limit, inspect the gears and shafts rather than compensating through installation adjustment.
Verify Injection Pump Timing
If you removed the injection pump or pump gear, verify pump timing before installing the timing cover.
Set the engine to the required No. 1 cylinder compression TDC position and check the pump timing reference according to the applicable service manual.
Do not assume the engine is correctly timed only because the crankshaft pulley mark is at TDC.
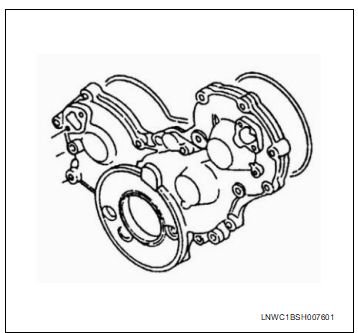
Install the Timing Cover and Crank Pulley
Once all timing marks have been verified:
- Clean the timing-cover mating surfaces.
- Install the timing gear case cover.
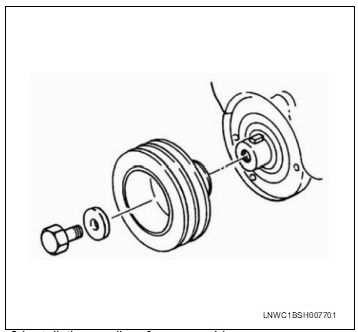
- Install the crankshaft damper pulley.
- Tighten all fasteners to the specification for the exact engine application.
Published 4JH1 service references can show different torque values for some components. Always use the workshop specification matched to the engine, vehicle, model year, and fastener application.
Rotate the Engine by Hand Before Starting
Before using the starter motor, manually rotate the crankshaft.
Stop immediately if you feel abnormal resistance.
Confirm:
- Engine rotates freely
- No locking bolts remain installed.
- No tools remain inside the timing area.
- Timing components do not bind.
- Timing references remain correct.
This is one of the most important checks after timing-gear work.
If the Engine Will Not Start After Installation
Use the symptom to guide the next check:
| Symptom | Check First |
| Cranks normally but will not start | Injection-pump timing |
| Cranks unevenly | Camshaft timing |
| Crankshaft will not rotate | Mechanical interference or locking bolt |
| Loud timing-gear noise | Backlash or gear installation |
| Runs with smoke or poor power | Cam/pump timing |
| Oil leak after repair | Timing-cover sealing |
A diagnostic scanner can help identify electronic faults, but it cannot confirm mechanical timing gear alignment.
Always check mechanical timing first if the problem appeared immediately after timing-gear work.
Diagnostic Tool for Post-Repair Checks
After confirming mechanical timing, an Isuzu-compatible diagnostic system can help check for remaining engine-control faults and review available live data.
For workshops servicing Isuzu commercial vehicles or Isuzu-powered equipment, OBD2TOOL offers:
ISUZU IDSS Diagnostic Tool with G-IDSS / E-IDSS Options
A compatible IDSS setup can be useful for post-repair tasks such as:
- Reading and clearing supported DTCs
- Checking available engine live data
- Verifying sensor signals
- Investigating electronic faults that remain after mechanical repair
Important: Diagnostic coverage varies by vehicle, engine, ECU, software, and application. Confirm 4JH1 compatibility for the exact vehicle or machine before purchase.
ISUZU Global Diagnostic System
This is another Isuzu diagnostic option for supported applications. Before ordering, confirm:
- Vehicle or equipment model
- Engine type
- ECU
- Diagnostic connector
- Required IDSS/G-IDSS/E-IDSS software
Use a scan tool after verifying mechanical timing, not as a substitute for timing-mark inspection.
Common 4JH1 Timing Gear Installation Mistakes
Avoid these problems:
- Installing the crankshaft gear backward
- Hammering the gear onto the crankshaft
- Aligning only the crankshaft and camshaft gears
- Ignoring injection-pump timing
- Losing scissor-gear preload
- Leaving the scissor-gear locking bolt installed
- Ignoring excessive backlash
- Starting the engine before manual rotation
Final Verification Checklist
Before returning the engine to service, confirm:
- Crankshaft gear timing mark faces outward.
- All timing marks align correctly.
- Gear backlash is within specification.
- Idler gear end play is acceptable.
- Scissor-gear locking bolt has been removed.
- Correct application-specific torque values were used.
- Engine rotates freely by hand.
- No oil or coolant leaks are present.
- Engine runs without abnormal timing-gear noise.
- No relevant active fault codes remain.
The key point is simple: install the 4JH1 crankshaft gear in the correct direction, verify the complete timing gear train mechanically, and use diagnostic software only for post-repair electronic checks.