Cummins Insite is a software program used for diagnosis and calibration of Cummins engines. It’s a comprehensive tool that provides detailed insights and troubleshooting capabilities for Cummins engine users.
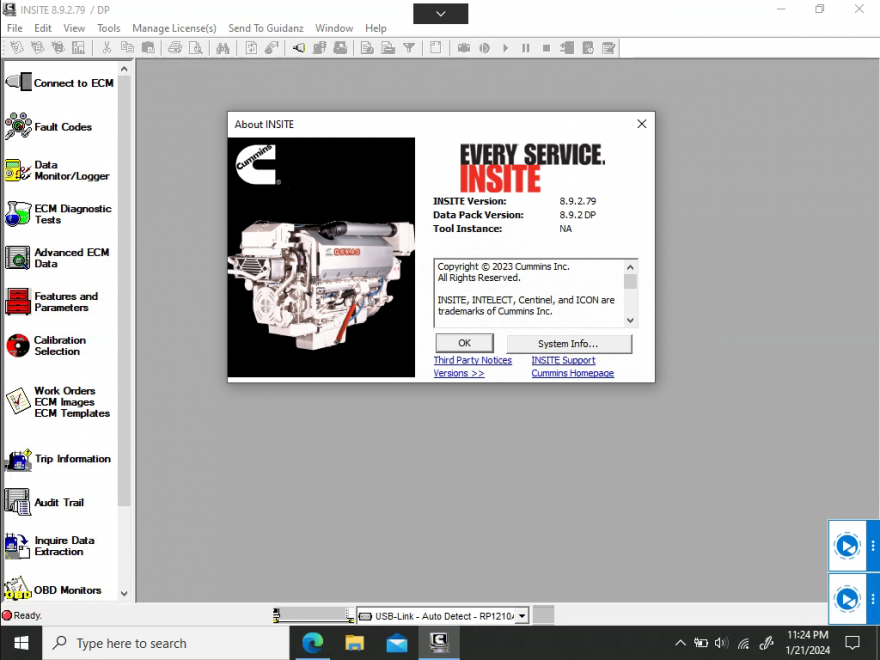
What is the newest version of Cummins Insite? 8.9.2.79 Pro
Product Name: Cummins Insite and Calterm package
Date of update: Update to current
Version: INSITE 8.9.2.79
Download file size: 2 GB
Languages: English, Deutsch, Espanol, Francais, Italiano, Portugues, Dansk, Nederlands, Suomi, Norsk, Svenska, Indonesian, Turkce, Pусски, Chinese, Japanese, Korean, Čeština, Ελληνικά, Magyar, Polski, Română.
Operating system (OS): compatibility Windows 10 / 11
Cummins INSITE 8.9.2.79 Pro Feature:
1. Cummins INSITE 8.9.2.79 Pro No Time Limited, can use it all the time
2. Cummins INSITE 8.9.2.79 Pro work with Cummins inline 7/6/5 hardware for all Cummins engine trucks diagnostic & programming
3. Cummins INSITE 8.9.2.79 Pro cover all function of Cummins INSITE 8.8 / 8.7 Pro version
4. Cummins INSITE 8.9.2.79 Pro including Automotive Calibrations Data Cummins INCAL and Reflash ECU data, read & write ECU
Insite 8.9.2.79 Pro Plus
INSITE™ is a Microsoft Windows™ based electronic service diagnostic program that allows you to troubleshoot Cummins electronic engines.
INSITE is a PC-based software application that provides quick and easy access to your engine’s electronic performance information, which enables faster service turnaround times. INSITE helps to ensure accurate procedures and diagnosis and limit downtime, while increasing productivity and profits.
Cummins INSITE software supplies engine information quickly, getting the inside details you need. No matter what kind of equipment you run, INSITE is the one support product to have in your virtual toolbox to fit every Cummins electronic engine.
Cummins INSITE 8.9.2.79 Pro Function:
• Fault code and symptom-based diagnostics
• Fault tree information
• Step-by-step troubleshooting information
• Accurate problem diagnosis
• Engine diagnostic tests
• Parameter and feature adjustment
• Trip and vehicle information
• Complete wiring diagram sand sensor location maps
• Tools to create templates for a group of vehicles
• Fleet management/driver reward programs(Need purchase separately)
• Audit trail information
• Enhanced ECM security(Need Purchase separately)
• Automotive Calibrations Data Cummins INCAL(Pro function included )
• Reflash ECU data, read & write ECU(Pro function included )
Recommend Contents for Cummins INSITE
INSITE V8.9.2.79 PRO 2024 Diagnosis Software Download Link
How to use cummins insite software
How to Update Cummins Insite Software for Win 7Win 8
How to update Cummins Insite Software to new version
- Backup Data:
- Before updating, it’s a good practice to back up any important data or configuration settings. This ensures that you don’t lose vital information during the update process.
- Check System Requirements:
- Ensure your computer meets the system requirements for the new version of Cummins Insite. These requirements can usually be found on the Cummins website or in the documentation provided with the software.
- Access Cummins Insite:
- Open your existing Cummins Insite software.
- Check for Updates:
- Look for an option within the software to check for updates. This is often found in the ‘Help’ menu or a similar section in the software.
- If there is an update available, there should be prompts or instructions on how to proceed.
- Download the Update:
- If the software indicates that an update is available, follow the prompts to download it. Ensure you have a stable internet connection during this process.
- Install the Update:
- Once the update is downloaded, run the installation process. This might require you to close the Cummins Insite software.
- Follow the on-screen instructions during the installation process. This may involve accepting terms and conditions, choosing installation locations, and other standard installation steps.
- Restart and Verify:
- After the installation is complete, restart your computer if prompted.
- Open the updated Cummins Insite software and check the version number to ensure the update was successful.
- Check for Functionality:
- Verify that all your settings and data are intact.
- Test the basic functions of the software to ensure everything is working as expected.
Update Cummins Insite for Window 7:
1.After putting the disc in the DVD drive, click on the Run autorun.exe field:
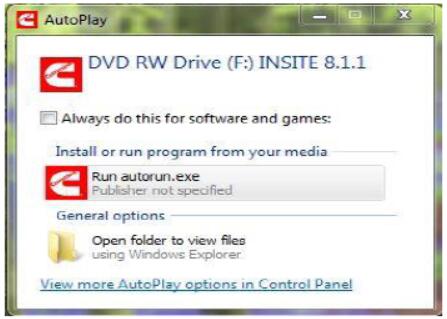
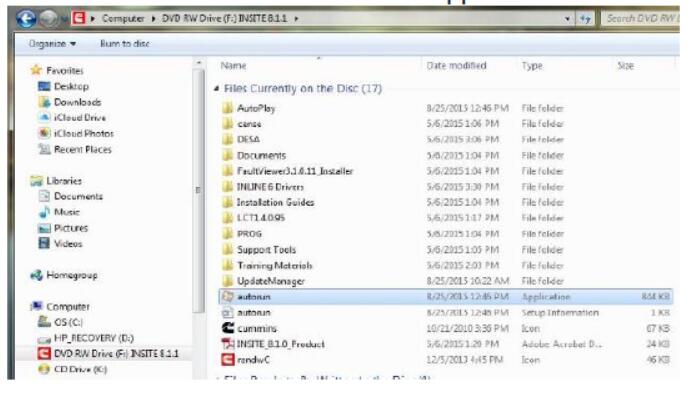
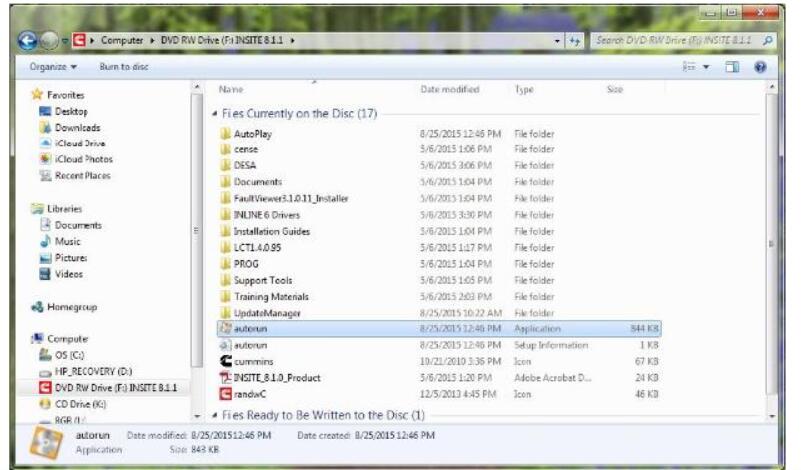
1.1 Alternately, if the AutoPlay is not enabled, open Windows Explorer, find the DVD-ROM drive (could be any letter), and click on the autorun or autorun.exe Application file:
2.If the Cummins Inc. Update Manager is already installed, proceed to step 12.
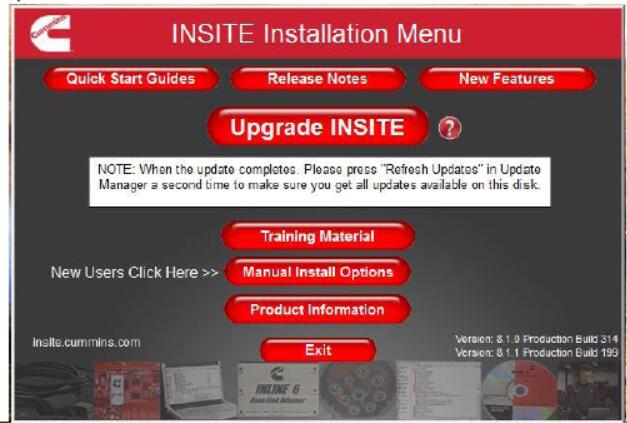
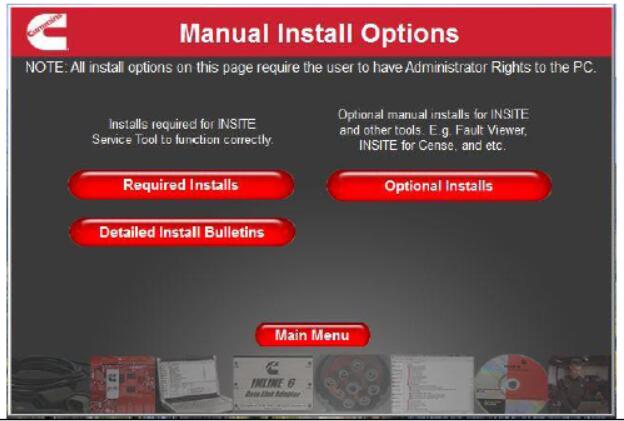
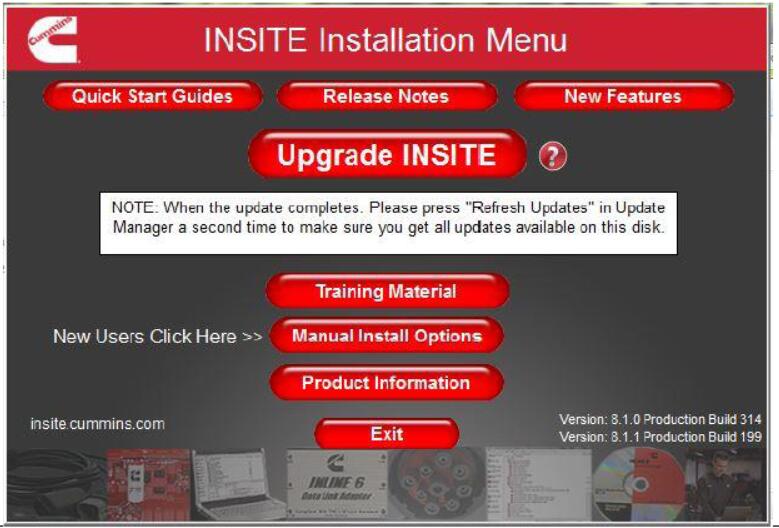
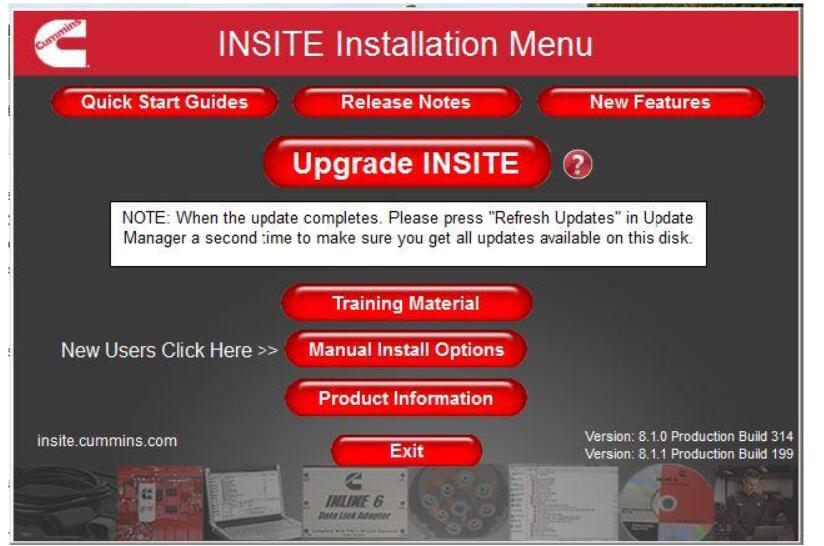
3.If Cummins Inc. Update Manager is not installed, in the INSITE Installation Menu that opens, click on Manual Install Options:
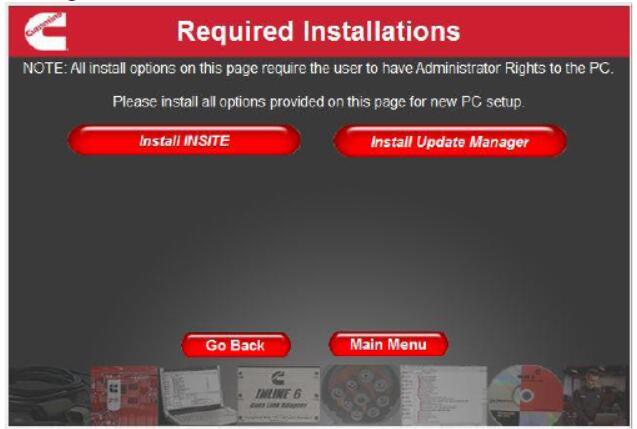
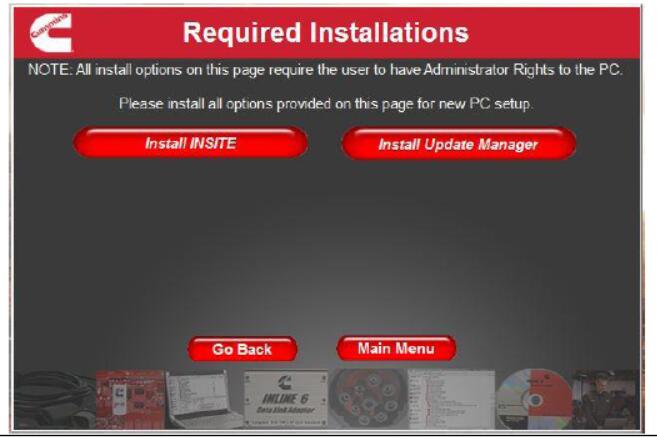
4.In the Manual Install Options screen, click on Required Installs:
5.In the Required Installation screen, click on Install Update Manager:
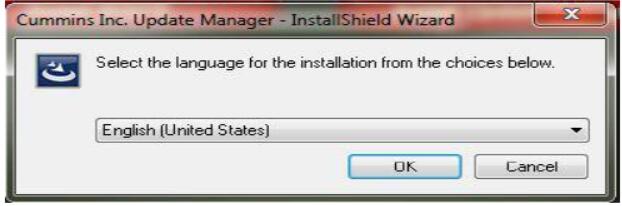
6.Approve the User Account Control prompt.
7.In the InstallShield Wizard language selection prompt, select the appropriate language, and then click on OK:
8.In the following InstallShield Wizard screen, click on Next:
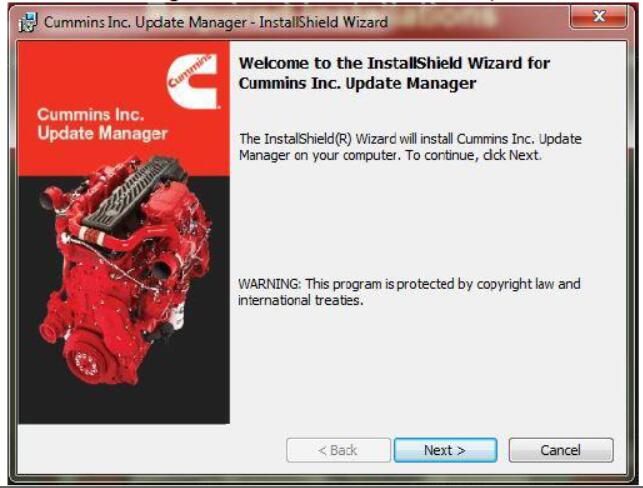
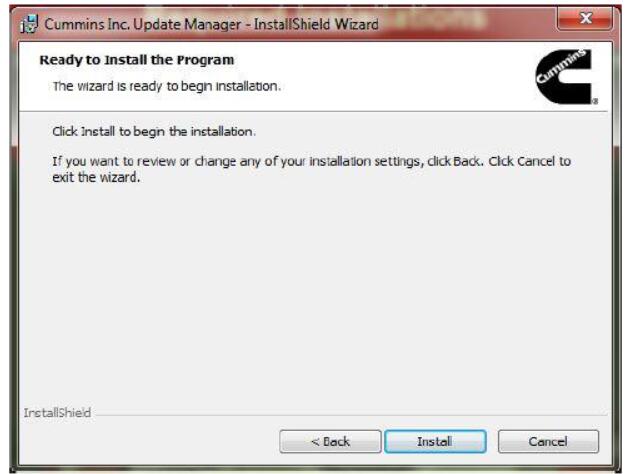
9.In the next Installation screen, click on Install to start the installation:
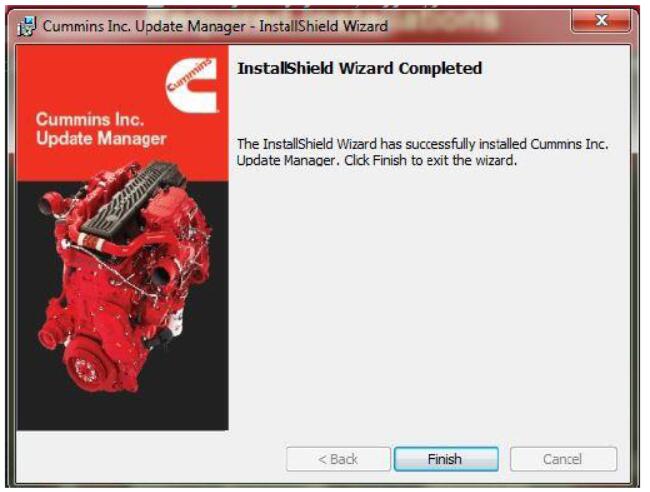
10.In the InstallShield Wizard Completed screen, click on Finish:
11.When you return to the Required Installations screen, click on Main Menu:
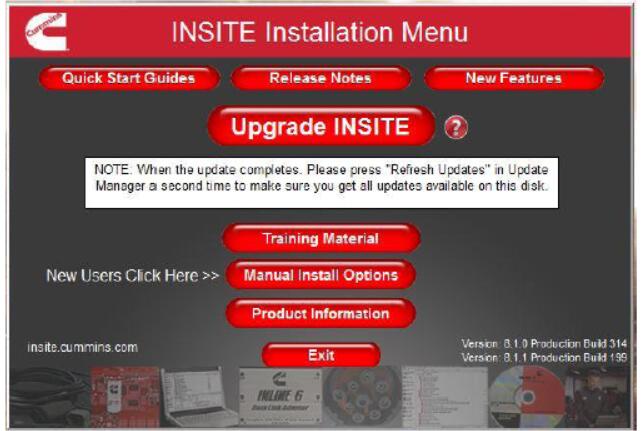
12.In the INSITE Installation Menu, click on Upgrade INSITE:
13.If you have just installed Cummins Inc. Update Manager, proceed to step 17:
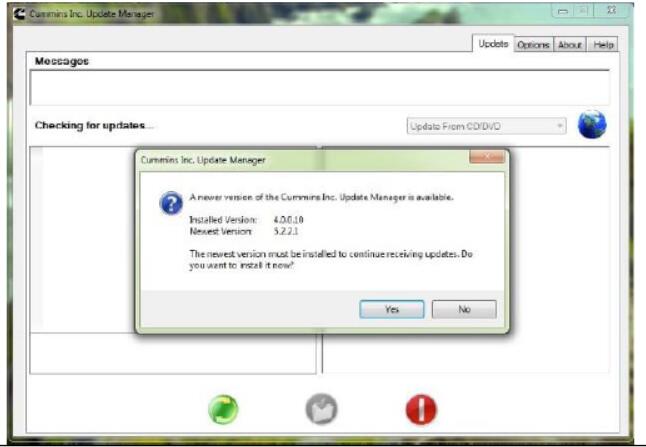
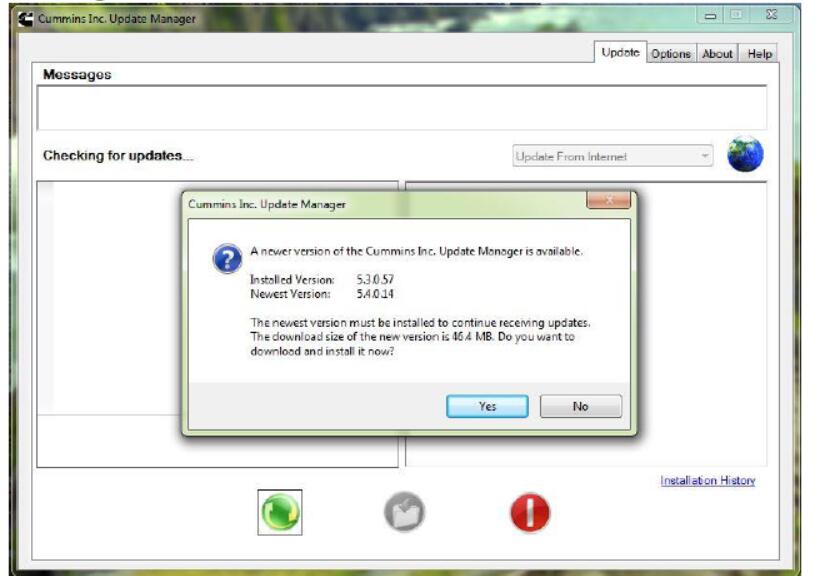
14.If Cummins Inc. Update Manager was already installed and has not yet been updated, click Yes in this prompt to update the Cummins Inc. Update Manager:
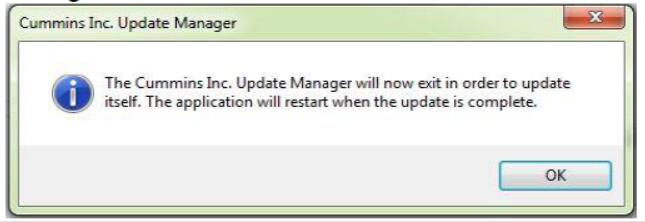
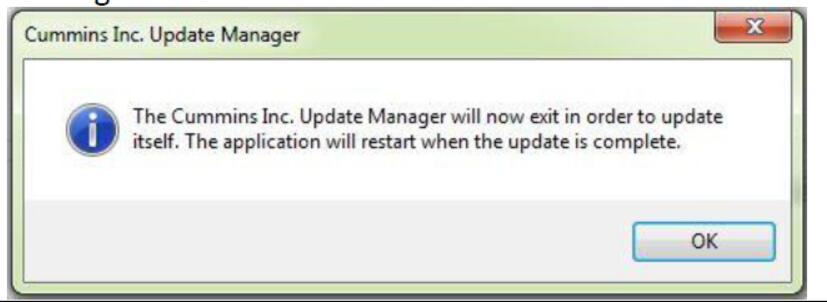
15.Click on OK in the prompt to exit the Cummins Inc. Update Manager:
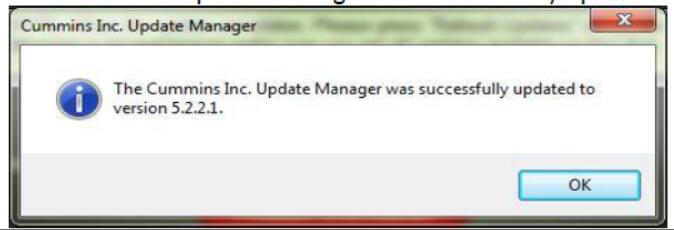
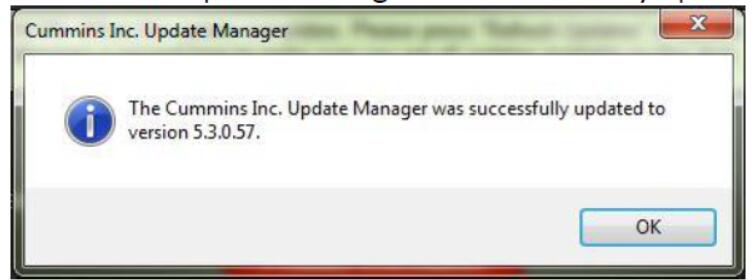
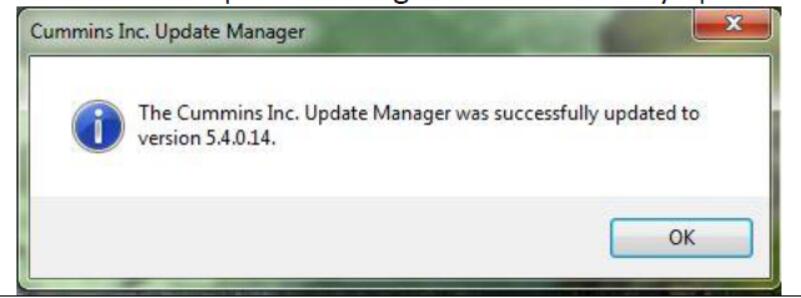
16.Click on OK in the prompt notifying the user that the Cummins Inc. Update Manager was successfully updated:
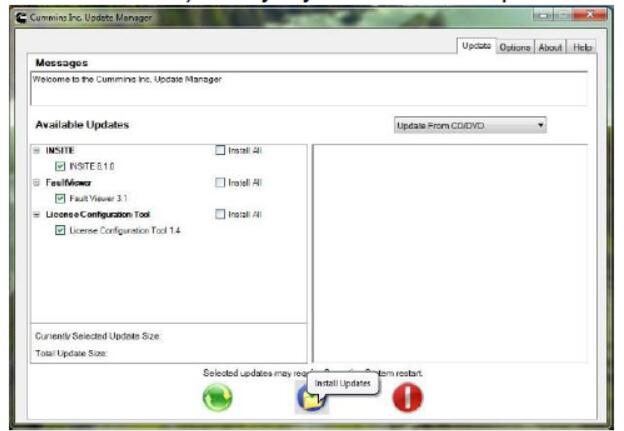
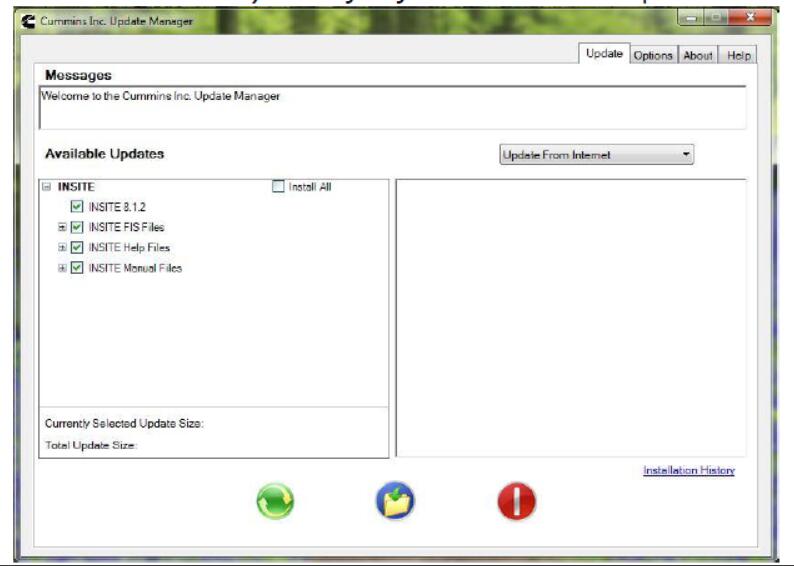
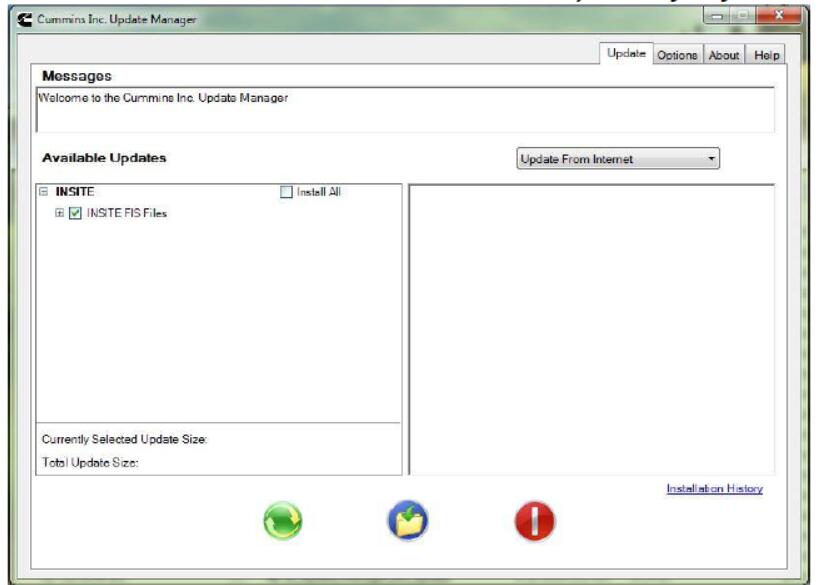
17.In the Cummins Inc. Update Manager click on the middle blue button with yellow file folder to Install Updates:
18.If you have Microsoft .NET Framework 4.5 or greater installed, please proceed to step 23.
If you still have Microsoft .NET Framework 4.0 installed, you will be asked to upgrade to Microsoft .NET Framework 4.5:
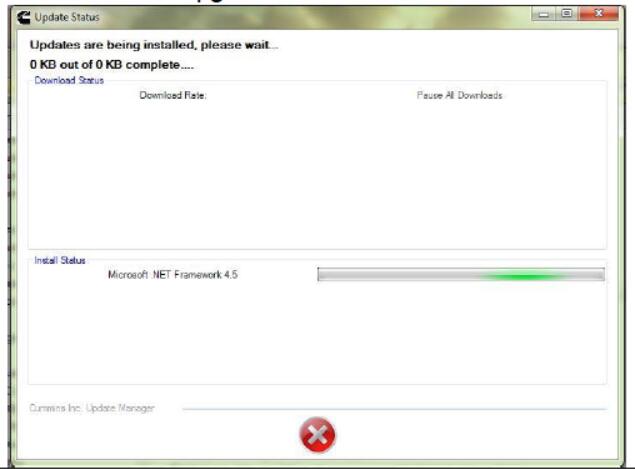
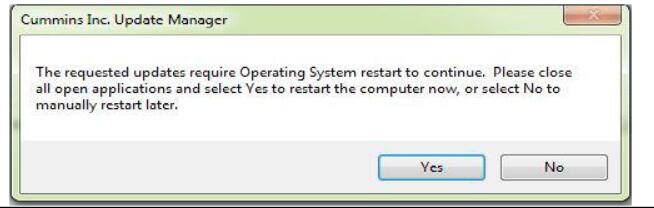
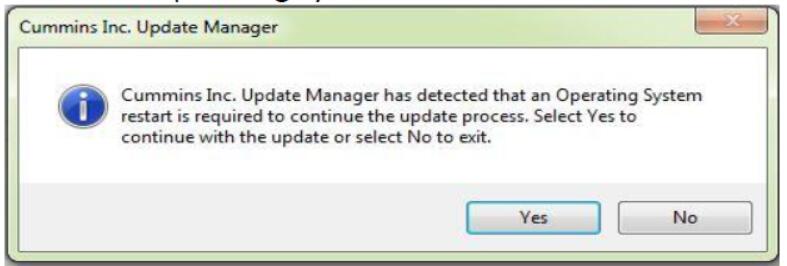
19.You will be asked to restart the operating system. Click on Yes:
20.After the system has been restarted, you will again need to go into Windows Explorer, and find the autorun or autorun.exe Application file to restart INSITE 8.1.0 & 8.1.1 installation DVD:
21.In the INSITE installation menu, again click on Upgrade INSITE:
22.In the Cummins Inc. Update Manager click on the middle blue button with yellow file folder to Install Updates:
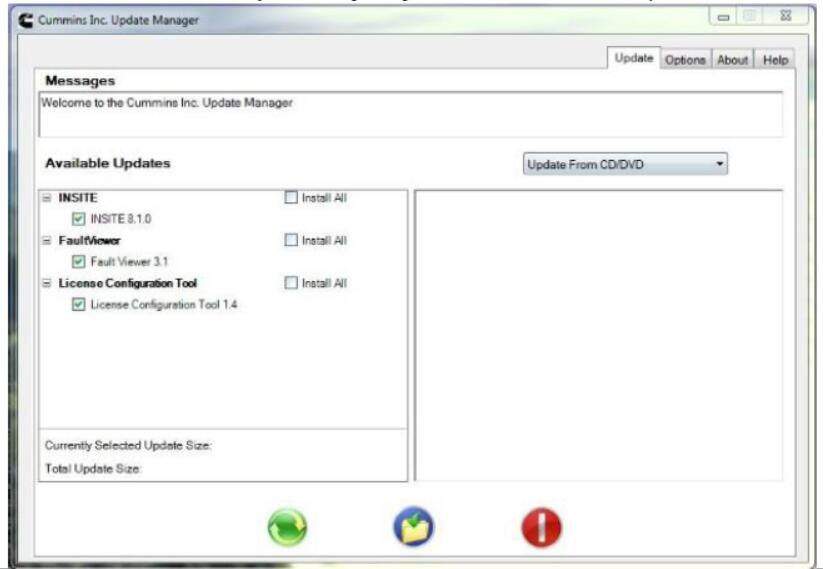
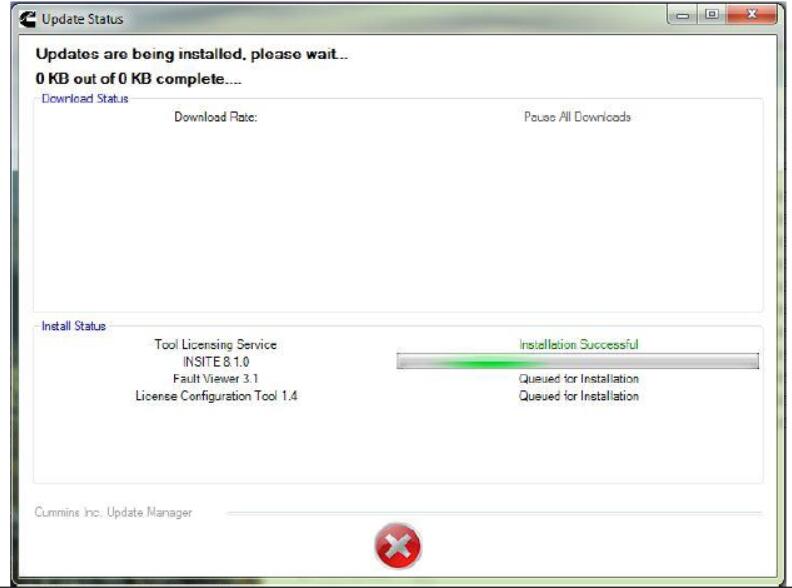
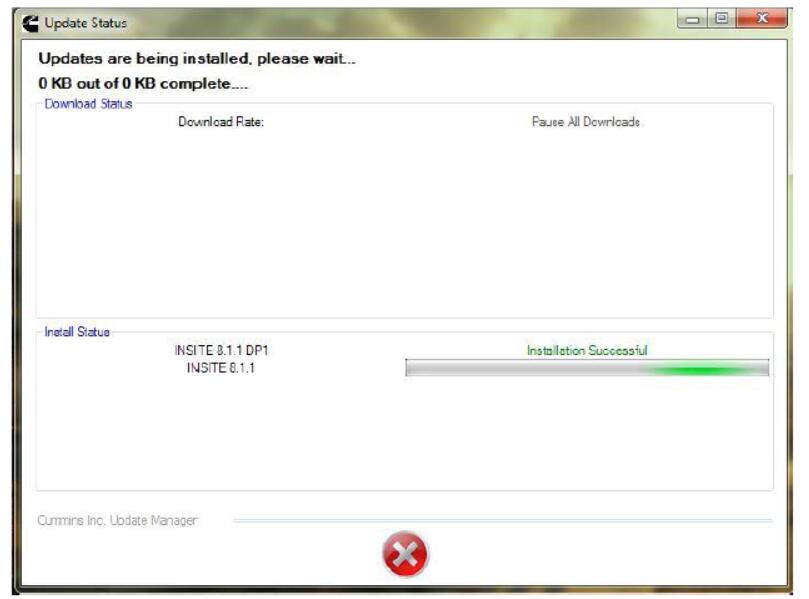
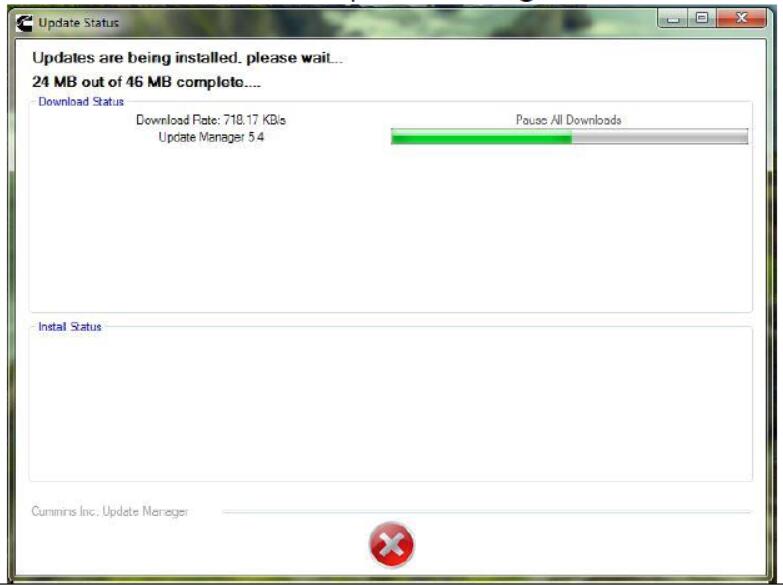
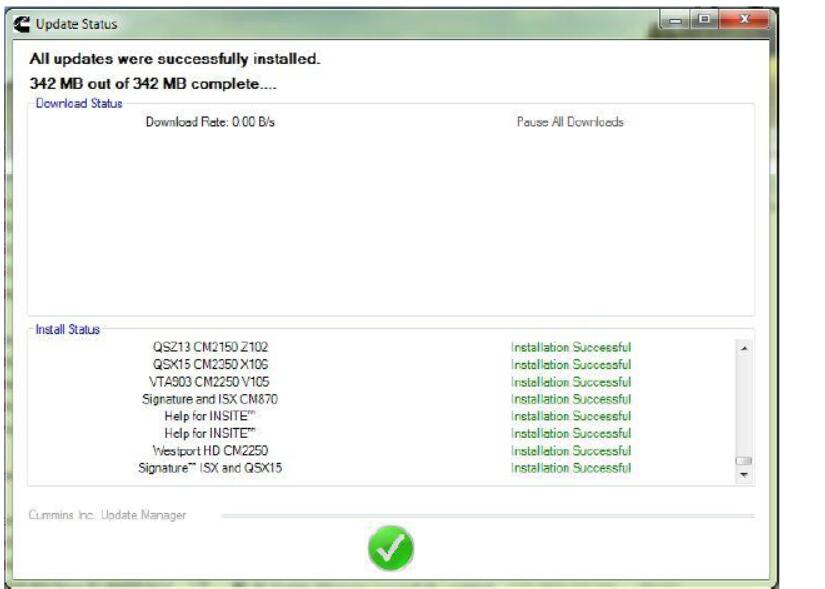
23.The Update Manager will show the progress of the installation of INSITE 8.1.0 and other files:
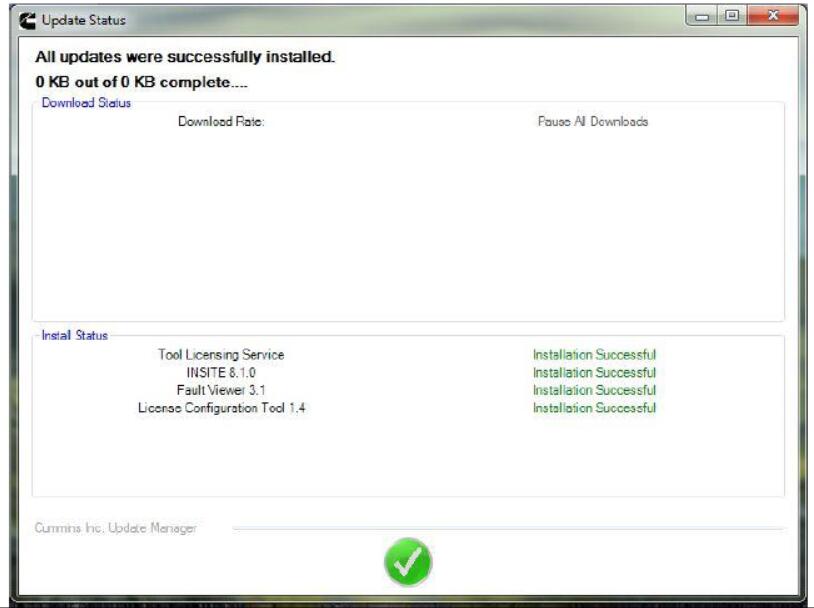
24.Once all the updates are complete, click on the green check mark:
25.Again, click on the middle blue button with the yellow file folder to Install Updates:
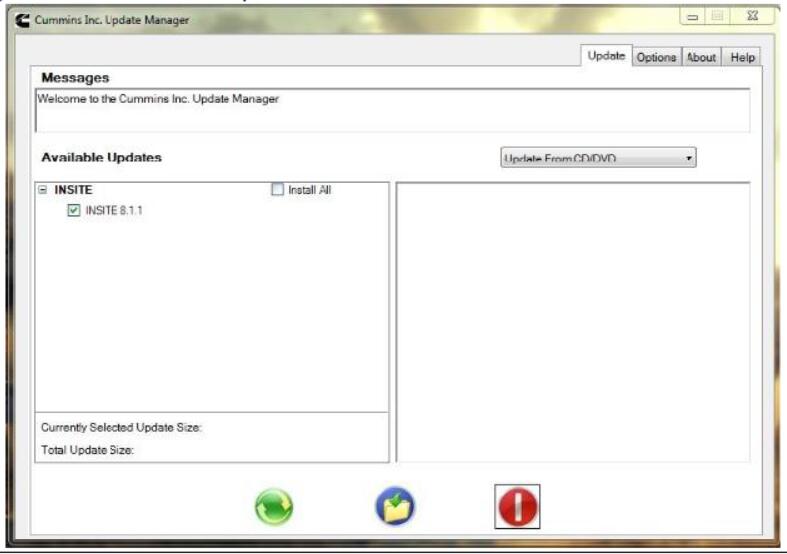
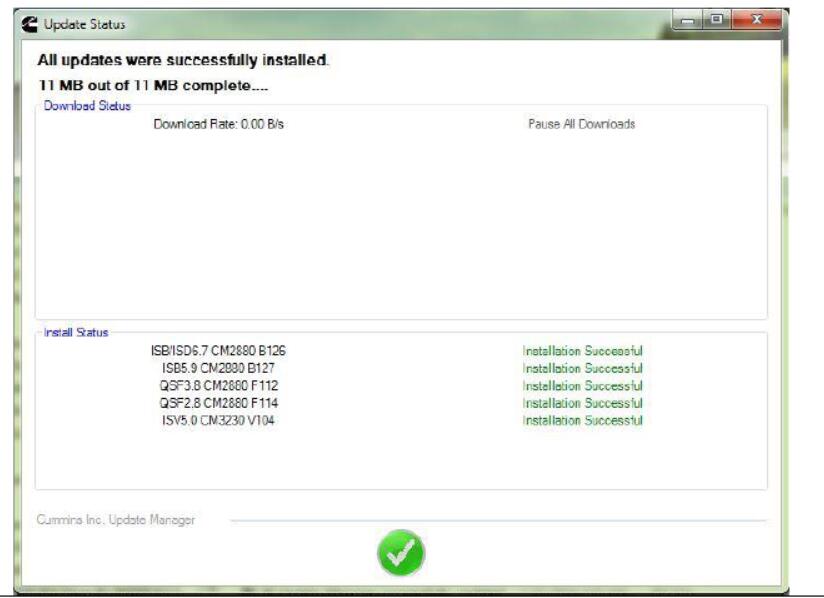
26.The Update Manager will show the progress of the installation of INSITE 8.1.1:
27.Once the updates are complete, click on the green check mark:
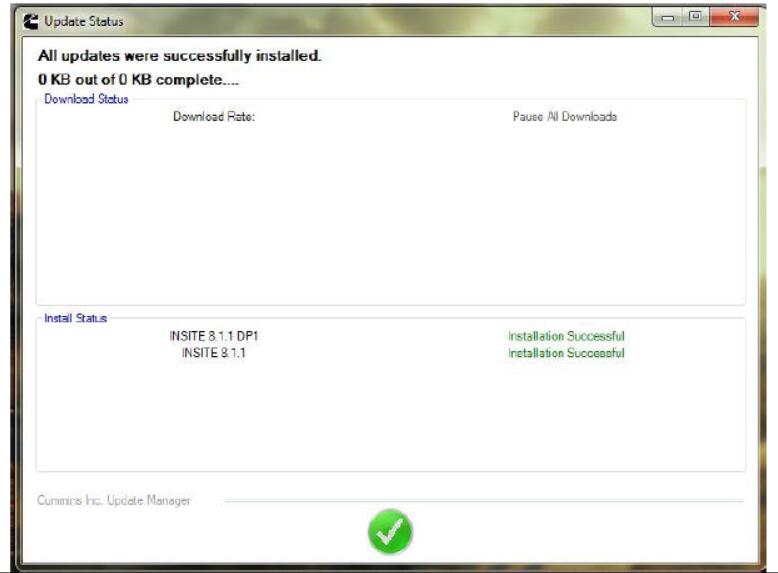
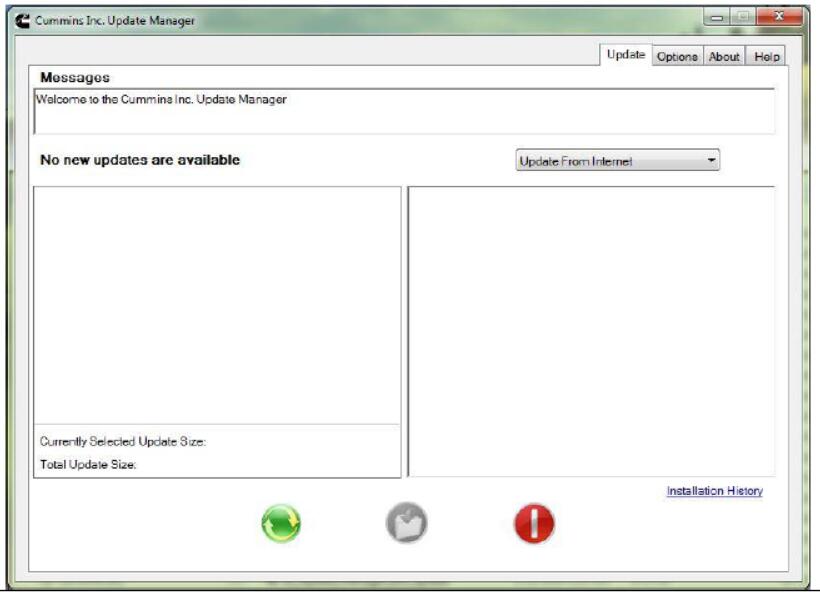
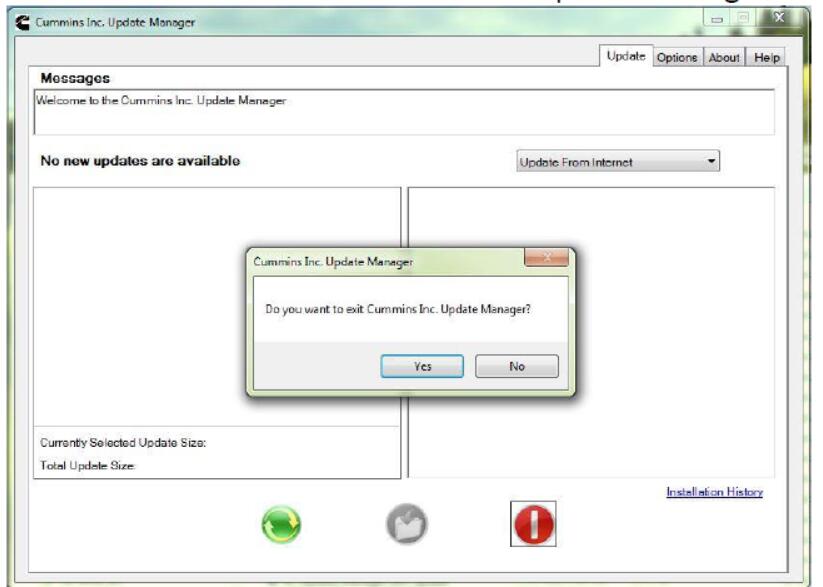
28.It will now tell you that No new updates are available:
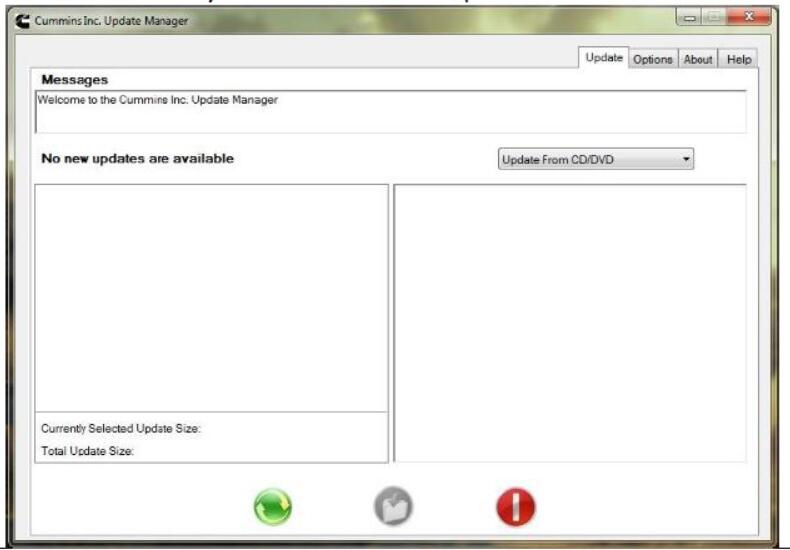
29.You will now need to change the drop-down box in the top right-hand of the window to point to the Internet. At this point, you will need a good and stable Internet connection. Click on the left-hand green button:

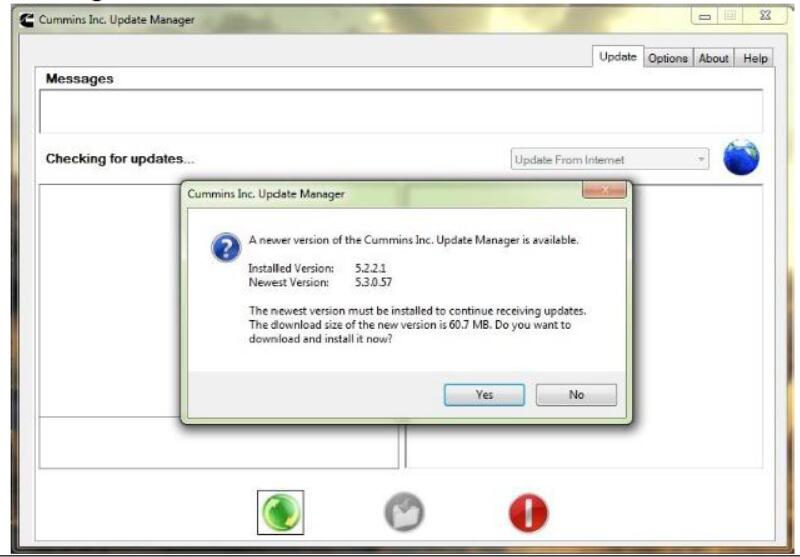
30.The Cummins Inc. Update Manager will update itself. Click Yes in this prompt to update the Cummins Inc. Update Manager:
31.You will see a prompt requesting you to restart the operating system. Click on Yes, but it may or may not restart the operating system, and you are not required to restart the operating system:
32.Click on OK in the prompt notifying the user that the Cummins Inc. Update Manager was successfully updated:
33.The Cummins Inc. Update Manager will again update itself. Click Yes in this prompt to update the Cummins Inc. Update Manager:
34.The Cummins Inc. Update Manager will show the progress of the download of the Update Manager:
35.Click on OK in the prompt to exit the Cummins Inc. Update Manager:
36.Click on OK in the prompt notifying the user that the Cummins Inc. Update Manager was successfully updated:
37.In the Cummins Inc. Update Manager click on the middle blue button with yellow file folder to Install Updates:
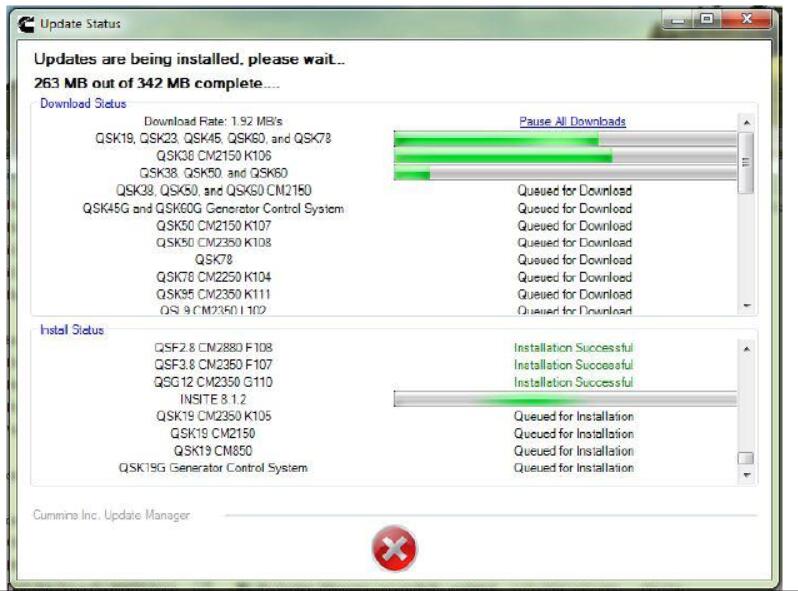
38.The Update Manager will show the progress of the downloads and installation of INSITE 8.1.2 and other files:
39.Once all the updates are complete, click on the green check mark:
40.You may be prompted again to update some FIS files. Again, click on the middle blue button with the yellow file folder:
41.Once the updates are complete, click on the green check mark:
42.Once all the updates are complete, it will state that No new updates are available. Click on the right-hand red button to exit:
43.Click on Yes to exit the Cummins Inc. Update Manager:
44.In the INSITE Installation Menu, click on Exit to close the screen:
45.Find the Cummins INSITE icon on the desktop and double click on it. If you still have a valid active license, INSITE should open.
Update Cummins Insite for Window 8:
Window 8 Cummins Insite update is same as Window 7.The only different is Windows 8 will already have Microsoft .NET Framework 4.5 or greater installed,can can skip this step to step 23.