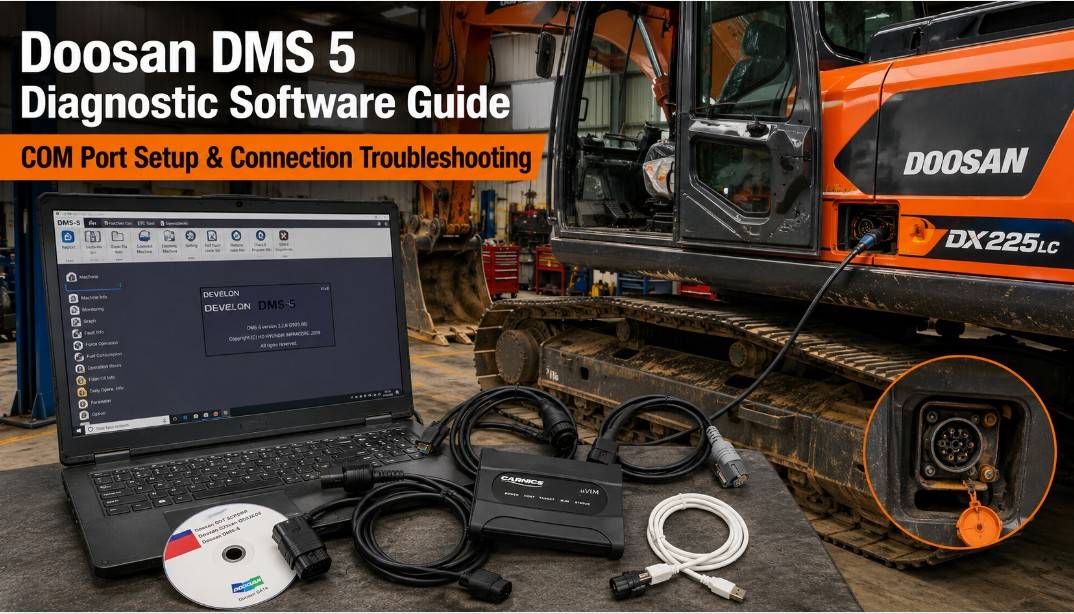
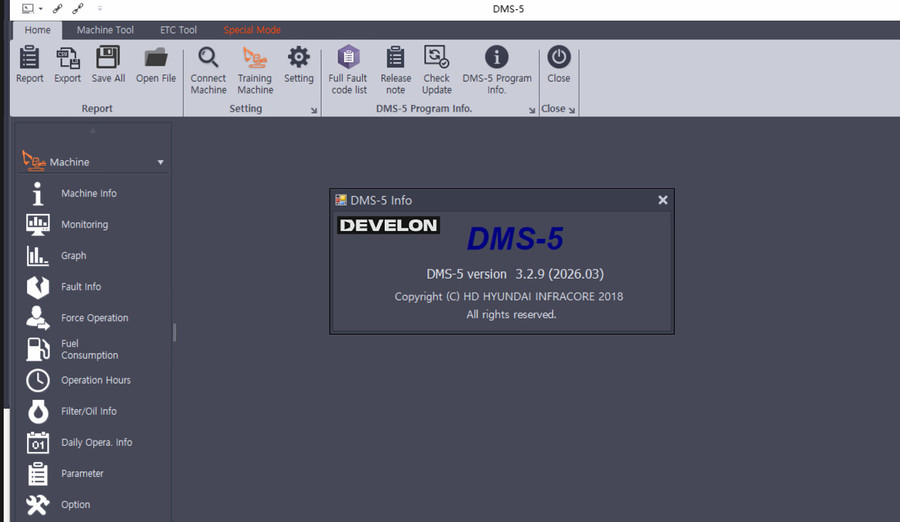
Doosan / DEVELON DMS 5 diagnostic software communicates with supported construction equipment controllers for troubleshooting, live-data monitoring, fault-history analysis, and machine-performance evaluation.
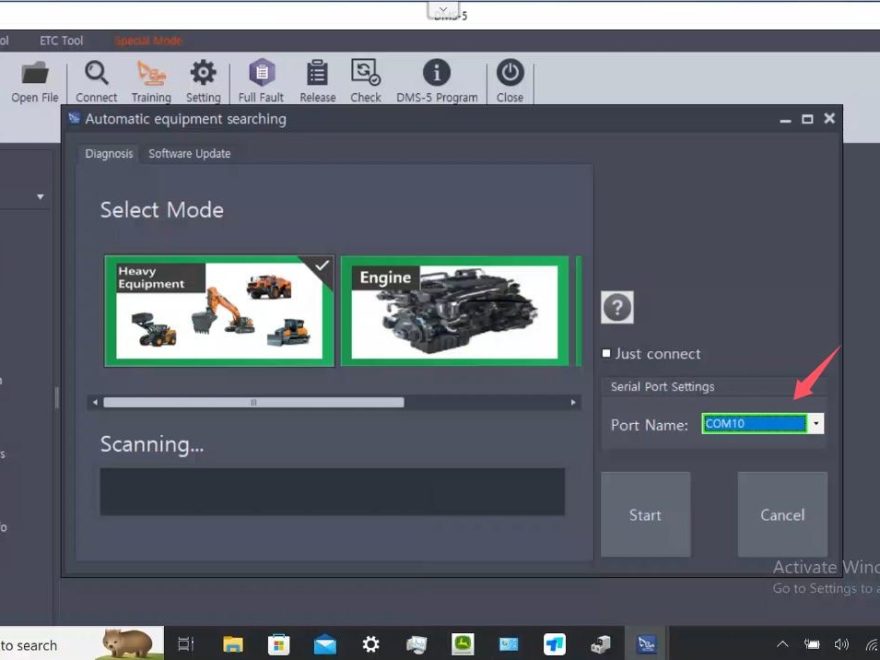
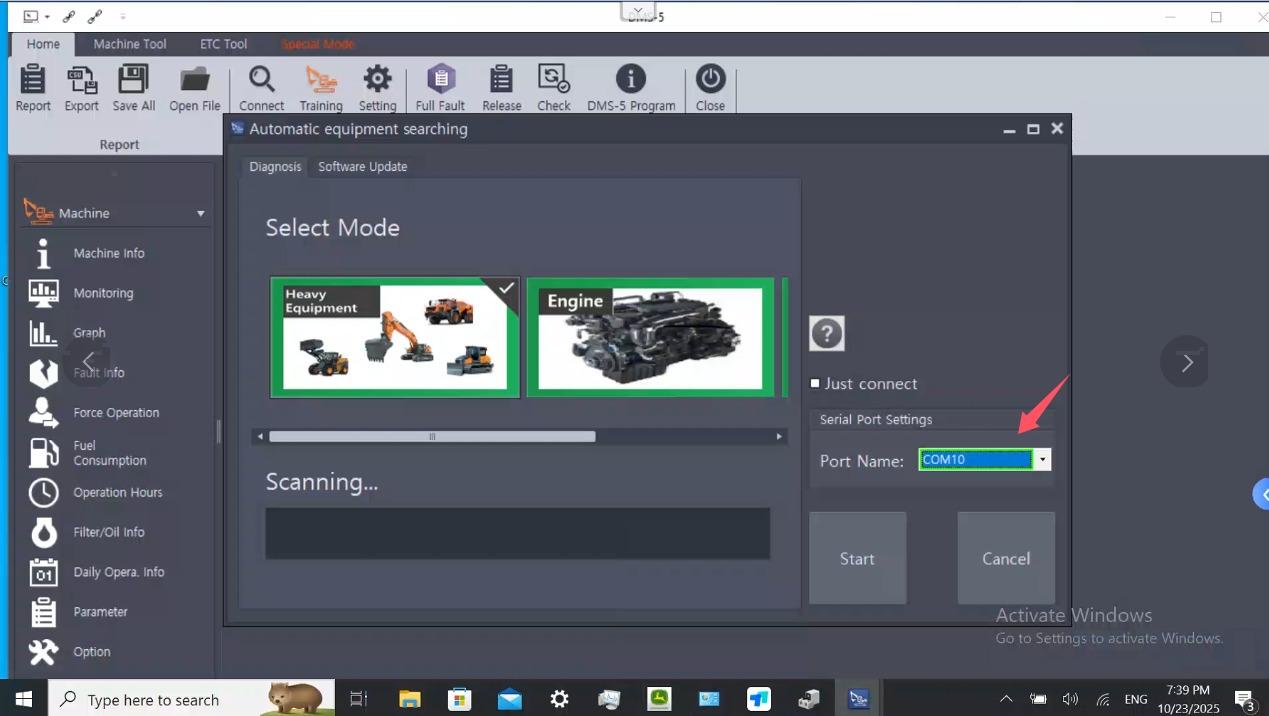
One of the most common reasons DMS 5 fails to communicate with a machine is an incorrect COM port selection. If the diagnostic interface is assigned to COM10 in Windows but DMS 5 is configured for a different port, the software may open normally while communication with the machine fails.
This guide explains what DMS 5 can do, how to identify the correct COM port, how to establish a reliable connection, and what to check when the software cannot communicate with a Doosan or DEVELON excavator or wheel loader.
What Is Doosan / DEVELON DMS 5?
DMS 5 is diagnostic software designed for supported Doosan and DEVELON construction equipment.
Depending on the machine and controller configuration, DMS 5 can communicate with systems such as the EPOS controller or VCU to help technicians inspect machine operating conditions and troubleshoot faults.
DMS 5 Software Information
| Item |
Information |
| Software |
DOOSAN / DEVELON DMS 5 |
| Type |
Construction Equipment Diagnostic Software |
| Manufacturer/Application |
Doosan / DEVELON |
| Region |
Worldwide |
| Languages |
Multiple languages, including English |
| Installation Size |
Approximately 8.6 GB |
| Operating Systems |
Windows 8/8.1 64-bit, Windows 10 32/64-bit, Windows 11 64-bit, Windows 11 Pro 64-bit* |
Compatibility note: Windows compatibility can depend on the exact DMS 5 software release, diagnostic-interface driver, and installation package. Before installing the software on a workshop computer, confirm that both the software build and communication-interface driver support the Windows version being used.
Need Doosan / DEVELON DMS 5 Software?
If you already have a compatible Doosan diagnostic interface and only need the diagnostic software, OBD2TOOL offers the DOOSAN / DEVELON DMS 5 Diagnostic Software.
Before ordering, confirm your machine model, Windows version, diagnostic interface, and required functions to make sure the software package is suitable for your setup.
What Can You Do With DMS 5?
DMS 5 is more useful than a basic fault-code reader because it allows technicians to examine both current machine behavior and stored operating information.
1. Monitor Machine Operating Status
DMS 5 can display the current operating status of supported equipment equipped with controllers such as EPOS or VCU.
This can help a technician determine whether the controller is receiving the expected inputs and whether monitored operating conditions agree with the machine’s actual condition.
2. View Sensor Data as Graphs
Major excavator and wheel-loader sensor values can be displayed graphically.
Graphing live data is especially useful when diagnosing an intermittent problem because it allows the technician to compare sensor behavior over time instead of looking at only one instantaneous value.
Where supported by the software, recorded data can also be saved to the laptop for later analysis.
For example, if a machine has an intermittent performance complaint, a technician can compare sensor values while:
- The engine is idling.
- Hydraulic functions are being operated.
- Engine load increases
- Travel functions are activated.
- The fault condition occurs.
A change that is difficult to see in a numerical data list may be much easier to identify on a graph.
3. Read Current and Historical Fault Information
DMS 5 can be used to review malfunction information stored by supported controllers.
Do not replace a component simply because a fault code identifies that circuit.
A better diagnostic process is:
Fault Code → Operating Condition → Wiring/Connector Check → Live Data → Component Test → Repair → Final Verification
A stored code may indicate a previous or intermittent problem rather than an active component failure.
4. Analyze Machine Operating History
Depending on the machine and controller, DMS 5 can provide operating information such as:
- Machine operating hours
- Filter information
- Oil/service information
- Daily operating information
- Machine working patterns
This information can be useful when investigating maintenance history, abnormal machine use, or recurring performance complaints.
Most Important DMS 5 Usage Precaution:
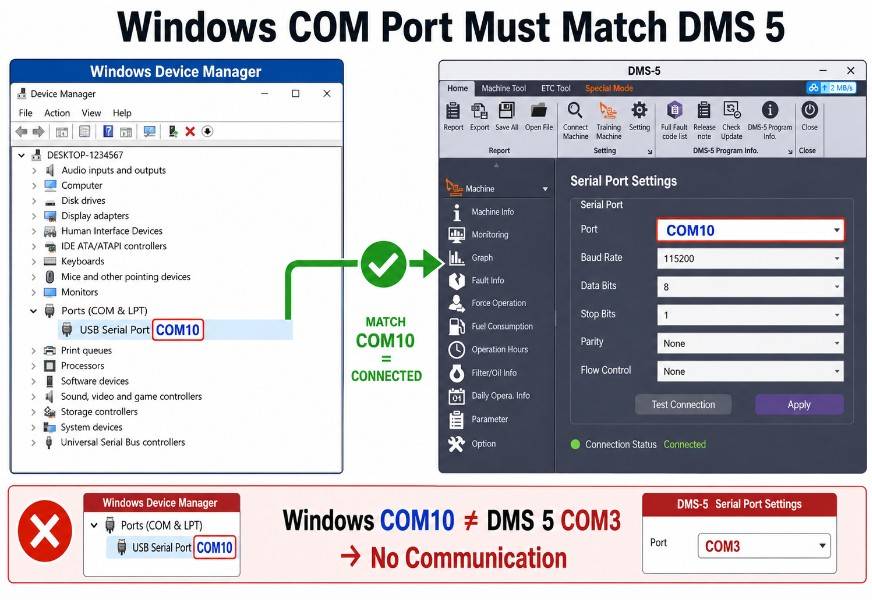 Select the Correct COM Port
If your DMS 5 diagnostic interface communicates with the laptop through a virtual serial port, Windows assigns the interface a COM number, such as:
The COM port selected inside DMS 5 must match the COM port assigned to the diagnostic interface by Windows.
Microsoft documents that serial devices can appear in Windows under Ports (COM & LPT) and recommends checking Device Manager when identifying COM ports.
Example
Suppose Windows Device Manager displays:
USB Serial Port (COM10)
DMS 5 must therefore be configured to use:
COM10
If DMS 5 is configured for COM3, COM5, or another port, the software may not communicate with the machine.
How to Find the Correct DMS 5 COM Port
Step 1: Connect the Diagnostic Interface to the Laptop
Connect the Doosan diagnostic communication interface to the computer using the required USB connection.
Wait for Windows to recognize the device.
Step 2: Open Windows Device Manager
Open:
Device Manager → Ports (COM & LPT)
Look for the diagnostic interface or USB serial device.
For example:
USB Serial Port (COM10)
In this example, COM10 is the number you need to enter or select in DMS 5.
If Ports (COM & LPT) is not visible, select:
View → Show hidden devices.
Microsoft also recommends checking the communication-device driver when COM ports do not appear correctly in Device Manager.
Step 3: Record the COM Number
Do not simply remember which physical USB socket you used.
What matters to DMS 5 is the COM number Windows assigned to the communication interface.
For example:
Diagnostic Interface → USB Serial Port → COM10
Step 4: Open DMS 5
Start the DMS 5 software and open the communication or interface settings.
Select the same port shown in Device Manager.
Example:
Windows Device Manager: COM10
DMS 5 Communication Port: COM10
These values must match.
Step 5: Connect the Interface to the Machine
Connect the diagnostic interface securely to the machine’s diagnostic connector.
Before attempting communication:
- Check that the connector is fully seated.
- Inspect the connector for damaged or corroded pins.
- Make sure the diagnostic interface is powered as required.
- Turn the machine ignition/key switch to the required diagnostic position.
- Make sure the laptop has recognized the interface.
Doosan Diagnostic Interface for DMS 5
A compatible communication interface is required between the diagnostic laptop and the machine. The Doosan uVIM Diagnostic Tool is designed for Doosan equipment diagnostics and can be used with DMS-5 for supported applications.
Always confirm the exact excavator, loader, forklift, engine, diagnostic connector, and required diagnostic function before ordering.
Step 6: Start Communication
Select the appropriate machine/controller configuration in DMS 5 and attempt to establish communication.
Once connected, verify that DMS 5 can retrieve information from the controller before beginning troubleshooting.
A good first check is to confirm that several live parameters change logically when machine conditions change.
DMS 5 Cannot Connect? Use This Troubleshooting Sequence
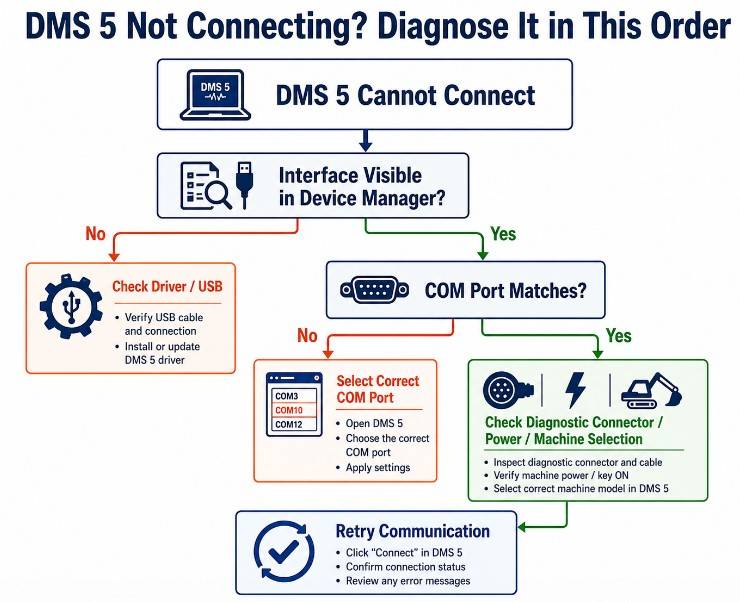
If DMS 5 displays a communication error or cannot detect the controller, do not immediately reinstall the software.
Check the communication chain systematically.
| Problem |
Possible Cause |
What to Check |
Corrective Action |
| No COM port appears |
Interface driver not loaded |
Device Manager |
Install or repair the correct interface driver |
| COM port appears but DMS 5 will not communicate |
Wrong COM port selected |
Compare DMS settings with Device Manager |
Select the matching COM port |
| Interface appears as Unknown Device |
Missing/incorrect driver |
Device Manager |
Reinstall the appropriate interface driver |
| Communication worked previously but suddenly stopped |
COM assignment may have changed |
Device Manager |
Recheck the current COM number |
| DMS sees interface but not machine |
Machine-side communication problem |
Diagnostic connector, power, ignition state |
Check connector and machine communication conditions |
| Connection drops intermittently |
Loose USB/diagnostic connection |
USB cable and machine connector |
Reseat connections and inspect the cable |
| Software communicates but data looks abnormal |
Wrong machine/controller selection or actual machine fault |
Machine information and live data |
Verify configuration before diagnosing components |
If the COM Port Is Missing From Device Manager
A missing COM port usually means the problem should be investigated at the Windows/interface level before troubleshooting DMS 5 itself.
Check the following.
1. Disconnect and Reconnect the USB Interface
Watch Device Manager while unplugging and reconnecting the diagnostic adapter.
A device appearing or disappearing can help identify which entry belongs to the adapter.
2. Check for an Unknown Device
Look under:
- Other devices
- Ports (COM & LPT)
- Universal Serial Bus controllers
If Windows detects the hardware but does not have the correct driver, it may appear as an unknown device rather than a usable COM port.
Microsoft recommends checking the device driver when a USB serial adapter is detected, but the expected COM port is unavailable.
3. Show Hidden Devices
Select:
Device Manager → View → Show hidden devices
Then check Ports (COM & LPT) again.
4. Check the Interface Driver
If the adapter is not recognized correctly, reinstall the driver supplied for the diagnostic interface.
Do not assume that successfully installing DMS 5 automatically installs every communication-interface driver required by the hardware.
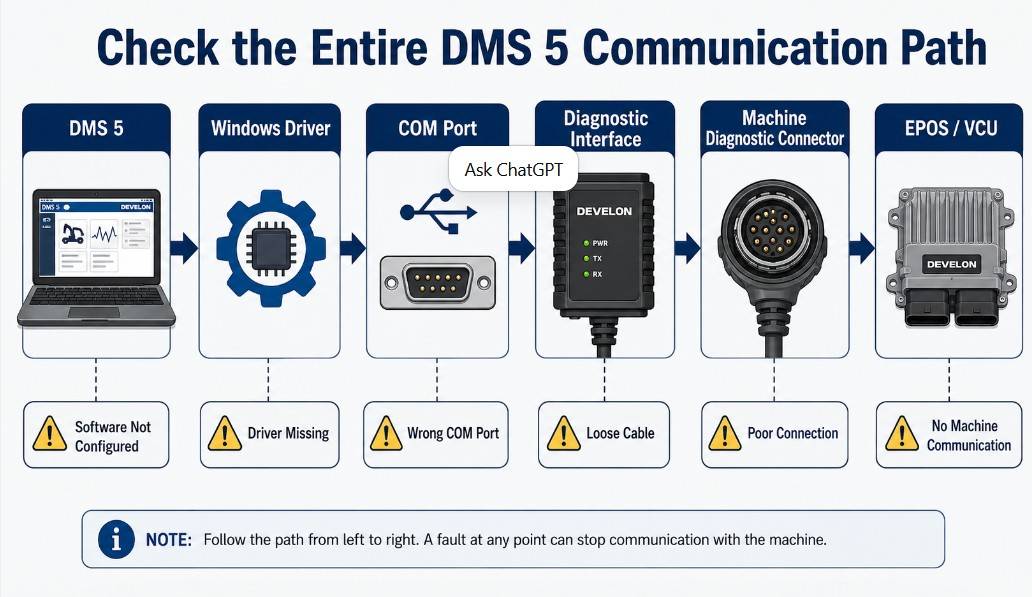
If the Correct COM Port Is Selected but DMS 5 Still Cannot Communicate
The COM port is only one part of the diagnostic communication path.
Think of the connection as:
DMS 5 → Windows Driver → COM Port → Diagnostic Interface → Machine Diagnostic Connector → EPOS/VCU
A failure anywhere in this chain can prevent communication.
Check the following in order.
1. Confirm the Interface Is Detected
First, confirm that Windows recognizes the diagnostic interface normally.
If Windows cannot communicate with the adapter, DMS 5 will not be able to communicate through it.
2. Confirm the DMS 5 COM Setting
Compare the software setting directly with Device Manager.
Do not assume the previous COM setting is still correct.
3. Close Other Diagnostic Applications
Only one application should normally control a serial communication interface at a time.
Close unnecessary diagnostic or serial communication programs before reconnecting.
4. Check the USB Cable and Connection
A poor USB cable can cause intermittent communication even when the interface initially appears in Device Manager.
If communication repeatedly disconnects:
- Reseat the cable.
- Use a direct laptop USB connection where practical.
- Inspect the cable for damage.
- Recheck Device Manager after reconnecting.
5. Inspect the Machine Diagnostic Connector
Check for:
- Bent pins
- Corrosion
- Loose terminals
- Contamination
- Damaged connector housing
- Poor power or ground supply to the diagnostic interface
Do not condemn the diagnostic software until the machine-side connection has also been checked.
6. Verify the Correct Machine and Controller
Make sure the software configuration matches the machine being diagnosed.
Depending on the model, DMS 5 may communicate with different controller types or machine configurations.
Selecting an incorrect configuration can lead to a failed diagnostic session or misleading information.
A Better Workshop Procedure for Using DMS 5
For repeatable diagnostics, use the same sequence every time:
- Identify the exact machine model and controller.
- Connect the diagnostic interface to the laptop.
- Confirm the interface in Windows Device Manager.
- Record the assigned COM port.
- Connect the interface to the machine.
- Set the machine to the required diagnostic condition.
- Open DMS 5.
- Select the same COM port shown in Device Manager.
- Select the correct machine/controller.
- Establish communication.
- Read active and stored fault information.
- Record relevant live data before repairing anything.
- Perform wiring/component tests based on the fault symptoms.
- Complete the repair.
- Reconnect DMS 5.
- Check fault status again.
- Confirm live data is normal.
- Operate the machine and verify that the original complaint is resolved.
This approach provides a much stronger diagnosis than simply reading a fault code, clearing it, and returning the machine to service.
Practical Technician Tips
Save Data Before Making Repairs
When investigating an intermittent problem, save useful sensor data or record important values before disconnecting components.
This gives you a baseline for comparison after the repair.
Do Not Diagnose From a Fault Code Alone
A controller may detect an electrical condition, but the code itself does not always identify the failed component.
Check the circuit, connector, power supply, ground, signal behavior, and relevant live data before replacing expensive parts.
Recheck the COM Port After Changing USB Connections
If DMS 5 worked previously but suddenly stops communicating after moving the interface to another USB connection or changing drivers, open Device Manager again and verify the assigned COM number.
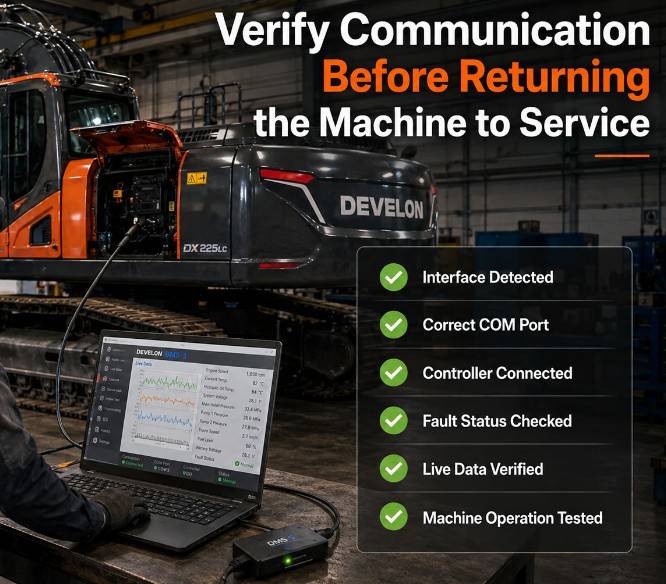
Verify the Repair With Live Data
After repairing the machine, do more than clear the fault history.
Confirm:
- The controller reconnects normally.
- The relevant fault is no longer active.
- Related sensor values are plausible.
- The machine responds normally during operation.
- The original symptom does not return.
Frequently Asked Questions
Why does Doosan DMS 5 not connect to the machine?
One of the first items to check is the COM port. The COM number assigned to the diagnostic interface in Windows Device Manager must match the port selected in DMS 5.
If the ports match, continue checking the interface driver, USB connection, diagnostic connector, machine power/ignition condition, and selected machine/controller.
Where can I find the DMS 5 COM port?
Open:
Windows Device Manager → Ports (COM & LPT)
Find the diagnostic interface and note the COM number displayed beside it.
For example:
USB Serial Port (COM10)
Then select COM10 in DMS 5.
What if Ports (COM & LPT) is missing?
First connect the diagnostic interface, then select:
Device Manager → View → Show hidden devices
If it still does not appear, check whether the interface is listed as an unknown device and verify that the correct driver has been installed. Microsoft documents these as standard checks when troubleshooting serial devices in Windows.
Can DMS 5 display live sensor data?
According to the DMS 5 package information covered in this guide, supported excavator and wheel-loader sensor information can be monitored and displayed graphically. Recorded data can also be useful for comparing machine behavior during troubleshooting.
Can DMS 5 read previous fault information?
DMS 5 can access current and historical malfunction information maintained by supported controllers such as EPOS or VCU, depending on the machine configuration.
Historical codes should be evaluated alongside machine symptoms and operating conditions, rather than automatically treated as current component failures.
Does DMS 5 work on Windows 11?
The software package described here lists Windows 11 64-bit and Windows 11 Pro 64-bit among its supported operating systems. However, successful operation also depends on the DMS 5 version and the diagnostic-interface driver. Verify the exact software package and interface compatibility before setting up a dedicated diagnostic laptop.
Need a Complete Doosan Diagnostic Setup?
If you need both diagnostic hardware and software rather than DMS 5 alone, consider the Doosan Excavator Inspection Diagnostic Tool. The package is intended for Doosan diagnostic work and offers DMS-5 software options together with the required diagnostic hardware and connection cables.
Before ordering: provide the machine model, year, engine or controller information, diagnostic connector type, and the function you need. This helps confirm compatibility before the tool is used in the workshop.
Final DMS 5 Connection Checklist
Before diagnosing the machine, confirm:
- DMS 5 is installed correctly.
- The diagnostic-interface driver is installed.
- Windows recognizes the diagnostic interface.
- The COM port is visible in Device Manager.
- The COM number in DMS 5 matches Windows.
- The USB cable is securely connected.
- The machine diagnostic connector is secure and undamaged.
- The machine is in the correct diagnostic condition.
- The correct machine/controller has been selected.
- DMS 5 can read valid controller information and live data.
If DMS 5 opens normally but cannot communicate with the machine, checking the Windows COM port should be one of the first diagnostic steps. A simple mismatch—for example, Windows assigning the interface to COM10 while DMS 5 is configured for another port—can prevent an otherwise correctly installed diagnostic system from working.
Not sure which Doosan diagnostic setup you need? Check the DMS 5 software, Doosan uVIM interface, or complete Doosan diagnostic kit above according to whether you already have compatible hardware. Confirm your exact machine model and diagnostic requirements before ordering.