Some customers who purchased the Super ICOM Pro N3+ are unsure how to set it up and begin diagnostics. To help, our engineers have prepared a detailed step-by-step guide below.
Step 1: Connect the N3+
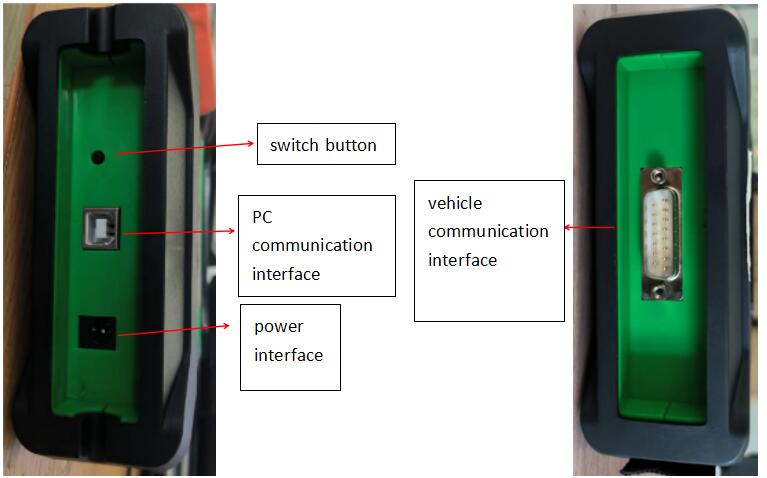
Plug the Super ICOM Pro N3+ into your vehicle’s OBD interface, and connect the N3+ USB cable to your computer.

Step 2: Power On the Computer
Turn on your computer and make sure the USB cable between the computer and N3+ is connected properly.
Step 3: Configure Network Settings
Open your computer’s Network Configuration interface and locate Realtek USB FE Family Controller.

Step 4: Set the IP Address
Click Properties → TCP/IPv4, then manually set the IP address as shown in the setup guide or product manual.
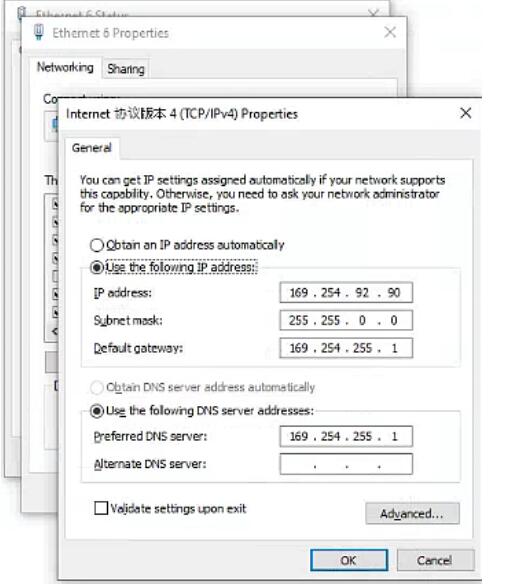
Step 5: Save Settings
Click OK to complete the network configuration. The computer is now bound to the N3+ device.
Tip: After setup, when the USB cable is removed, the network icon will disappear automatically. You do not need to reset the IP address when reconnecting the same N3+ device. However, if you use a different N3+, you’ll need to reconfigure the IP.
Step 6: Test with BMW Diagnostic Software
Launch the BMW diagnostic software (such as ISTA/D or ISTA/P) to begin testing and diagnostics.
Step 7: Wireless Connection
For wireless use:
- Unplug the USB cable from the computer.
- Look for the Wi-Fi SSID named N3+ICOM-****.
- Connect to it directly using the password 123456789.
- Open the BMW diagnostic software to start working wirelessly.
Step 8: Using J2534 for Other Brands
When using the J2534 function of the N3+ for Mercedes-Benz, Toyota, Volkswagen, Honda, Land Rover, and other brands:
- Launch the specific diagnostic software.
- Install the J2534 driver.
- In the software, select the PassThru menu and choose ISO J2534 device.
- Connect the N3+ to your computer via USB.
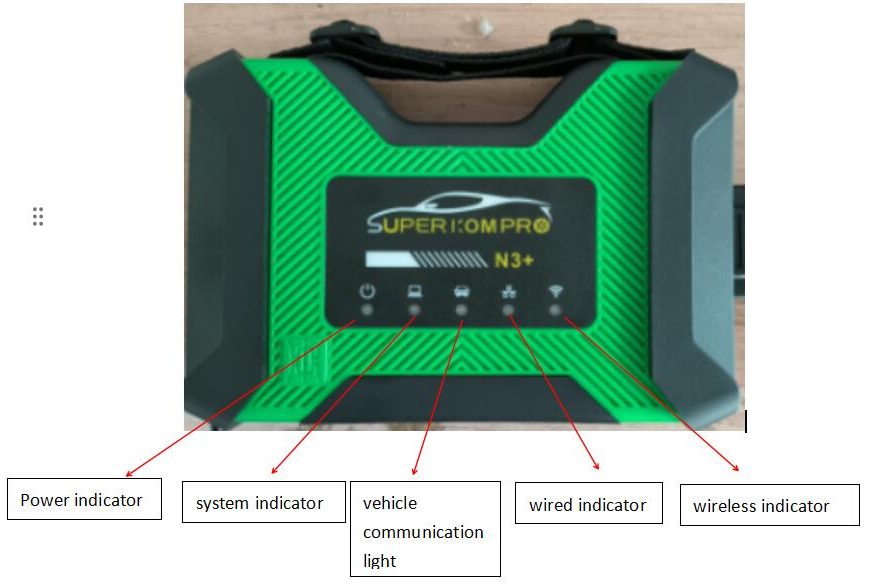
- Press and hold the N3+ switch button for 3 seconds until the wired/wireless indicators start flashing. You can now perform tests normally.
Step 9: Using the DOIP Function
To test vehicles using the DOIP protocol (such as new Mercedes-Benz, Volkswagen, or Land Rover models):
- Connect the N3+ to your computer using the USB cable.
- Press and hold the N3+ switch button for 3 seconds until both indicator lights flash.
- Turn on your computer’s Wi-Fi and connect to the N3+ ICOM-** network** using the password 123456789.
- Start your diagnostic software, open the DOIP menu, and begin testing.
Step 10: Key Features and Functions
The Super ICOM Pro N3+ is a professional BMW diagnostic tool that runs BMW software 100% natively, ensuring identical vehicle coverage and results as the original BMW inspection system.
Its multi-functional design also supports J2534 and DOIP testing for other brands. While it doesn’t cover all advanced functions of factory diagnostic systems, it effectively supports CAN, K-line, and DOIP protocols, making it a versatile replacement for traditional J2534 and ENET cables.
For more details or technical support regarding the Super ICOM Pro N3+, please contact us directly:
https://www.obd2tool.com