JPRO diagnostic software is a leading tool in the commercial vehicle industry, providing comprehensive diagnostics and repair solutions for fleet operators and service providers. One of the critical functionalities of JPRO software is the Maintenance Mode test, especially for vehicles equipped with Intellipark systems. This article will guide you through the process of using the Maintenance Mode feature within the JPRO software.
Understanding Intellipark Systems and Maintenance Mode
Before diving into the process, it’s important to understand what Intellipark systems are and why Maintenance Mode is crucial. Intellipark is an electronic parking brake system that enhances safety by preventing rollaway incidents. When the vehicle’s Intellipark Electronic Control Unit (ECU) is set to Maintenance Mode, it freezes its current state and deactivates all advanced features to facilitate safe diagnostics and repairs.
Related Contents:
JPRO Noregon Commercial Fleet Diagnostics 2024 2019 Free Download
Noregon JPRO DLA+ 2.0 Adapter
Procedures:
1 Select Maintenance Mode and press Enter or the Start Button.
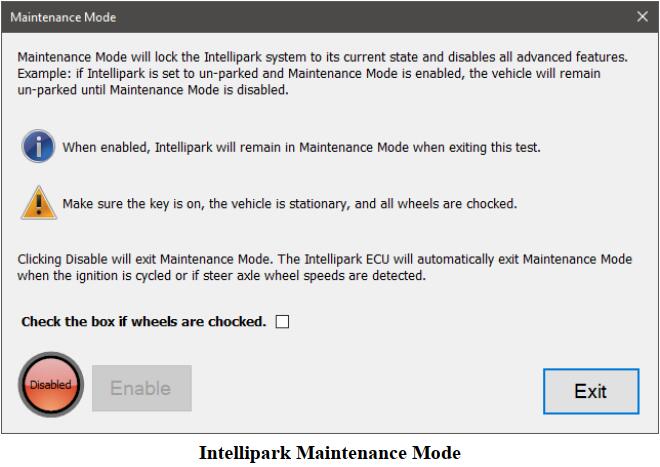
2 The test dialog will be displayed.
NOTE: Vehicle must be secured from rolling before enabling maintenance mode.
3 Click the checkbox to confirm that the vehicle’s wheels have been chocked. The Enable button will become available.
4 Click Enable to set maintenance mode to the Intellipark’s current state. Maintenance mode will remain enabled even after this test dialog is closed, allowing other tests and maintenance procedures to be performed.
5 Maintenance mode will remain enabled until this test is run again to disable maintenance mode. Maintenance mode will automatically disable if the ignition is cycled or if steer axle wheel speeds are detected.
6 When done, press the Exit button to return to the test selection dialog.
More topics about JPRO Diagnostic,please refer to: Heavy Duty Diagnostics Guide